The Grey Audio Reference
- Exact Audio Copy (EAC)
- How to Install and Setup EAC to Make Flawless Rips on Windows
- How to Install and Setup EAC to Make Flawless Rips on Linux
- How to Flawlessly Use EAC to Rip on Windows
- Ripping Pre-Gap Hidden Tracks (HTOA)
- CD Burning Guide
- CD Rip Logs
Exact Audio Copy (EAC)
How to Install and Setup EAC to Make Flawless Rips on Windows
REDACTED.ch Wiki article imported on 15-02-2023
This guide goes over the one-time setup process for EAC. Once you have completed setup, please continue to the EAC Ripping Guide to properly rip your discs.
Download link: http://www.exactaudiocopy.de/en/index.php/resources/download/
Current version as of this guide: EAC 1.0 Beta 3.
This guide was made for EAC version 1.0 beta 3 and will not completely work with earlier versions (which are not recommended any longer). Versions 0.99 or earlier are considered outdated, and should not be used.
Anything with a green outline around it is a required setting. Anything orange is required but depends on your drive. Anything unmarked is optional. This is meant to be a no-frills guide with little extra info. The old EAC 0.99 guide is more comprehensive (but outdated as far as settings go since there are new features in EAC 1.0) - visit it if you run into problems, the background information is basically still correct.
Step 1: Download and install EAC
Download the installer and fire it up.
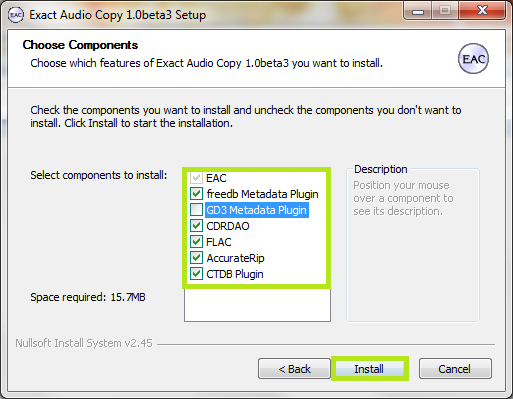
Eventually you'll get to a screen like this. Make sure you install AccurateRip, CDRDAO, CTDB and freedb as a bare minimum. FLAC will be useful as well if you don't have it separately installed. GD3 is only useful if you want to pay for metadata results. I assume you don't.
Note: The above screenshot is from Beta 3. The new Beta 3 adds the option to include the CueTools Database Plugin. It is recommended to install it but not required. Full details for installation of the plugin on older versions is located in the appendix at the end of this guide.
Step 2: Start EAC
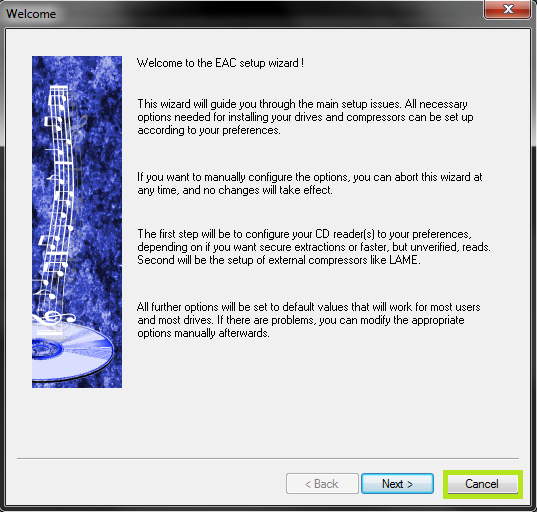
When you first start EAC, you'll see a screen like this one. Hit "Cancel". Next, put a popular CD into your drive, preferably not one that was recently released (a few months old at least). You'll see a window like the one below appear. If you have an older version of EAC or dBpoweramp installed, it's likely AccurateRip was already configured, and this may not appear. You may need to try multiple CDs to get this to show up.
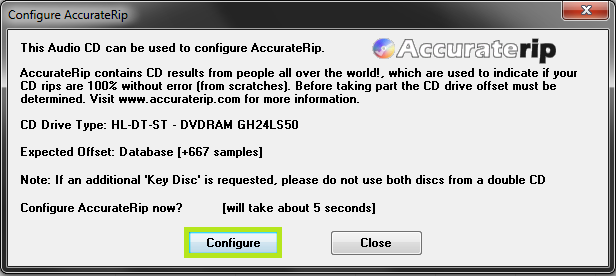
Hit Configure. It may take a few minutes. Hit "Ok" afterward. This is a necessary step, make sure you try several CDs.
Step 3: EAC Options
All of the options dialogs can be found from the EAC menu at the top of the screen.
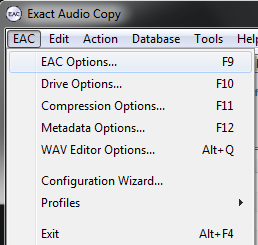
Start with EAC Options. Any tabs not pictured are completely optional settings, or are irrelevant to ripping.
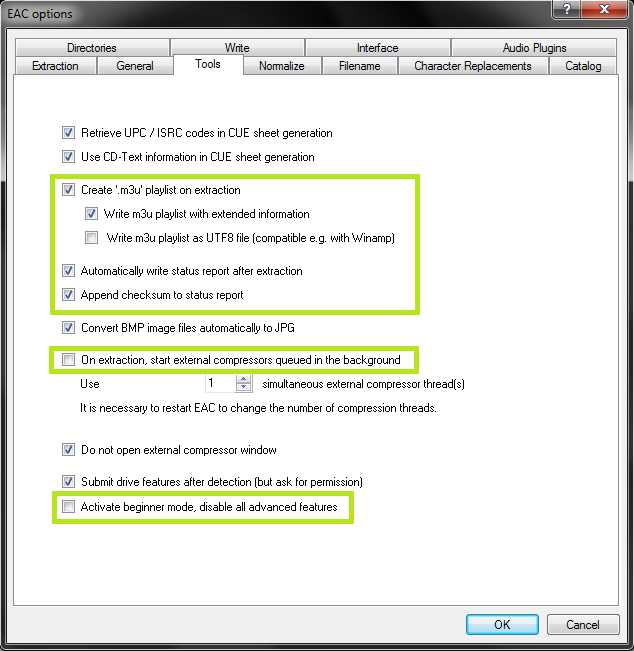
If your drive is capable of reading UPC/ISRC codes and CD-Text (you can only really figure this out by trial and error), you're welcome to keep the top two options checked. Otherwise, uncheck them.
Other than that, these settings are pretty much ideal. I wouldn't recommend using more than 1 compressor thread even if you have a multicore computer. It doesn't take very long compared to the track extraction anyway. Note that in tests run by punkmeup, disabling the queue of external compressors in the background fixed an issue where EAC was generating WAV files instead of FLAC, so I've made that a required option. It should have no bearing on the rip quality. If rip queueing works for you (it does for me), feel free to leave it enabled.
Note that m3u file creation is technically optional, however, some users use these files to manage their libraries.
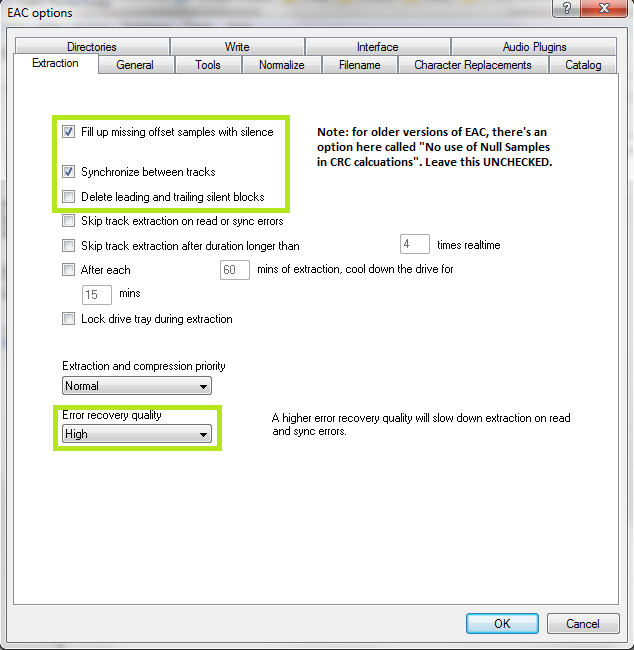
Make sure you set the green highlighted settings as shown. If you're using an older version of EAC, make sure "No use of null samples for CRC calculations is UNCHECKED. The rest is optional, choose as you will. Locking the drive tray during extraction isn't a bad idea though.
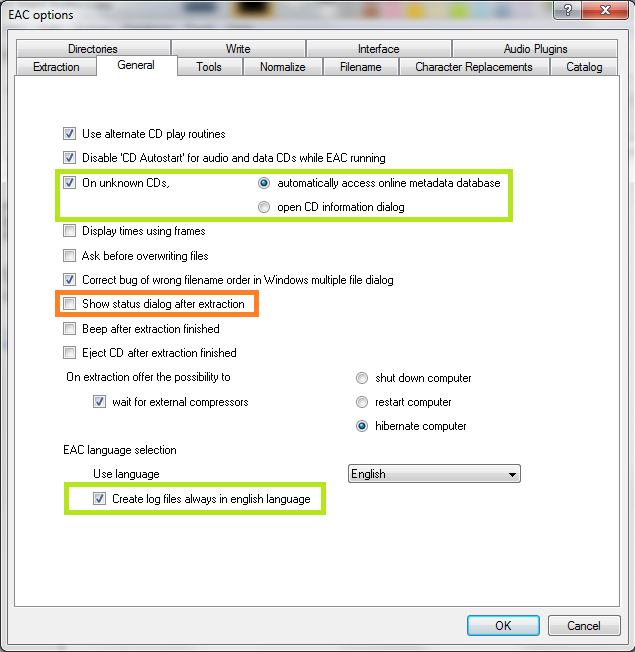
These settings are pretty much all optional and self explanatory. I'd recommend using Alternate CD play routines and disabling autostart though. The "Create log files always in english language" box will help ensure that logchecker.php will be able to properly parse your log. EAC's non-English translations aren't well standardized and therefore hard to parse.
The "Show status dialog after extraction" option setting has been problematic for some users. This displays the log after the rip is done, and offers you the option to save the log file. If you follow this guide, EAC will do this automatically. Do NOT hit "Save Log". As such I've disabled the setting here. Only turn it on if you know what you're doing.
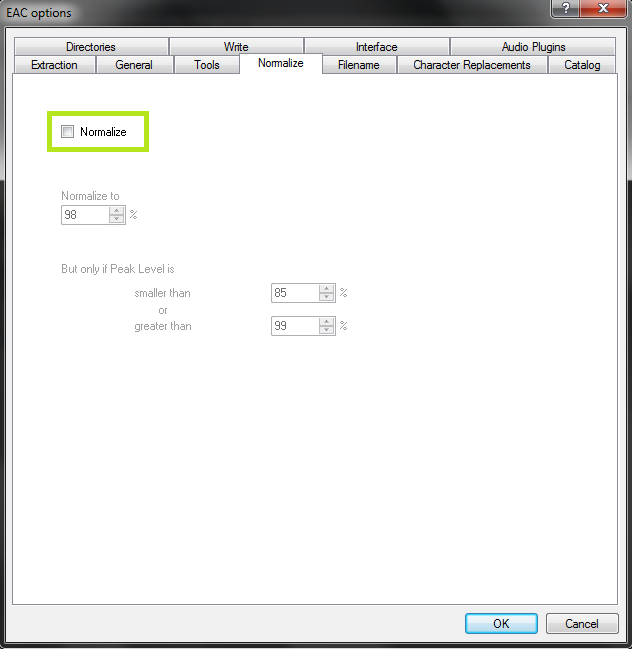
Friends don't let friends normalize their EAC rips. Don't ever do it. The rip will no longer be a true "exact copy" of the CD and any rip with Normalization will be removed from the site.
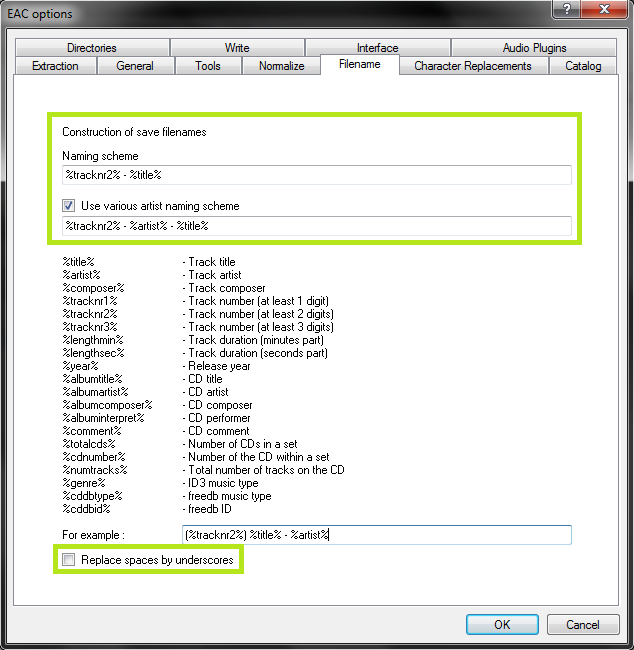
As shown in the screenshot above here is the proper way to name tracks.
Naming Convention : %tracknr2% - %title%
Check 'Use Various Artists Naming Scheme' and use : %tracknr2% - %artist% - %title%
The only difference acceptable here would be perhaps %tracknr2%. %title% if you prefer periods instead of dashes in the filenames. If you need track numbers to go into triple digits for some reason, use %tracknr3% instead.
Don't replace spaces by underscores. It looks ridiculous.
A note on directory naming schemes and cuesheets:: Don't use a directory structure in your EAC filename options, unless you want to go back and edit your CUE sheet later. When you add a directory to the naming scheme, it'll put that directory path into the files. When, at a later date when you may have moved the files, you want to burn the files in EAC using your cuesheet, you'll be unable to do so. If you do insist on using a directory structure here, you need to go back, edit the CUE sheet in a program such as notepad, and remove the folder name from each line.
For example, a cuesheet line should look like this:
FILE "01 Last Known Surroundings.wav" WAVE
Not like this:
FILE "C:\EAC Rips\Explosions in the Sky - Take Care, Take Care, Take Care (2011) [FLAC]\01 Last Known Surroundings.wav" WAVE
If you insist on doing this, the scheme might look something like this:
%artist% - %albumtitle% (%year%) [FLAC]\%tracknr2% - %title%
Follow the listed items on the Filename tab if you prefer a different scheme.
Step 4: Drive Options
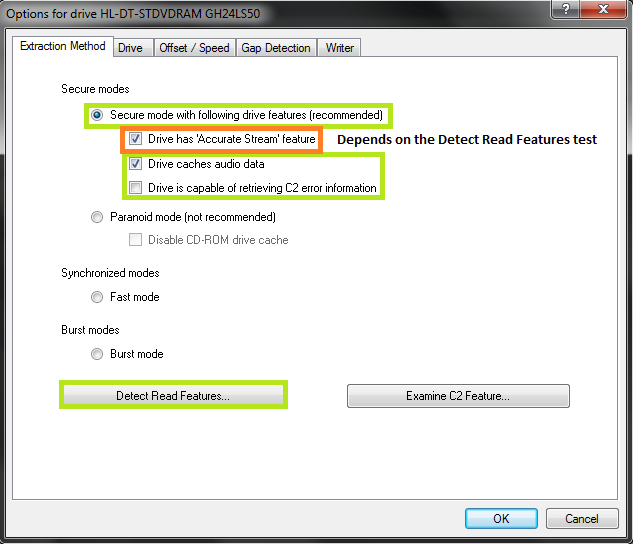
Start by hitting "Detect Read Features...". This will actually take a few minutes. The only feature detection that actually matters is Accurate Stream. If your drive can use it, checkmark the setting (most modern drives have Accurate Stream). If it can't, don't.
Even if your drive doesn't cache audio, it will not harm the rip quality to leave that checked. The rips take a bit longer with that setting enabled, though. Go watch TV or something while you wait.
Do not use C2, even if EAC thinks you can. Most drives have terrible C2 error implementation.
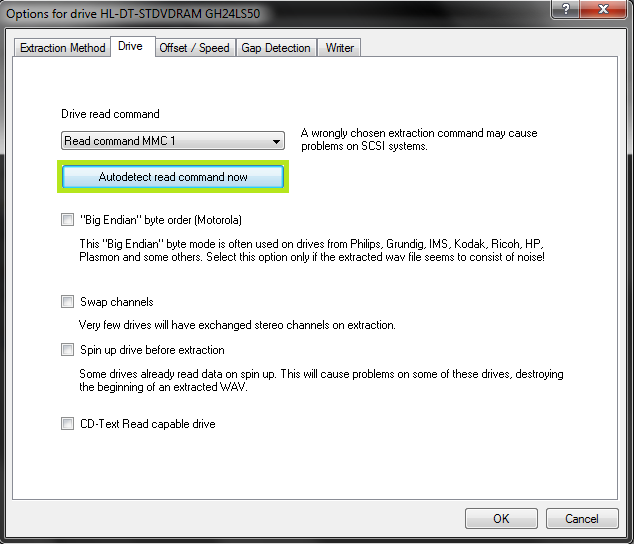
Hit "Autodetect read command now". It shouldn't take long. Leave everything else unchecked unless you're having problems. You can checkmark "CD-Text Read capable drive" if you want to test whether your drive can do it. If it can, great, otherwise, uncheck it. It's unlikely you'll ever use that feature anyway.
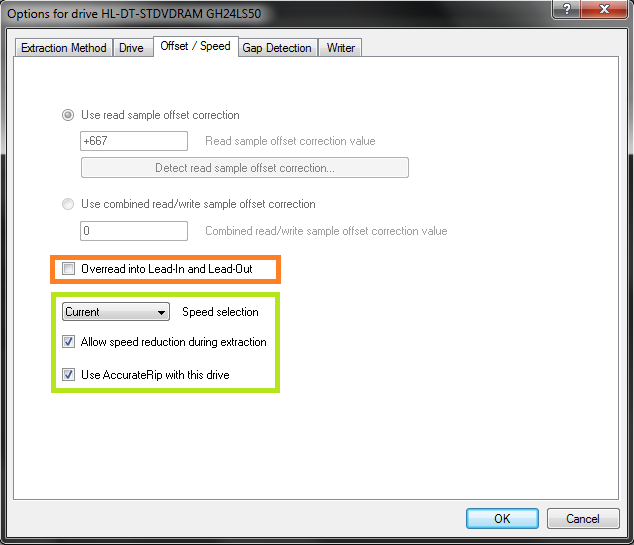
If you did the AccurateRip configuration at the start of this guide, the top half here will be greyed out. AccurateRip is a very useful function for checking that your rips are OK, so you will need to go back and get it configured if this option isn't greyed out.
If you want to figure out whether your drive needs "Overread into Lead-in and Lead-Out" checked, you can check by temporarily unchecking "Use AccurateRip with this drive". Stick a CD in the drive and hit "Detect read sample offset correction...". If you're just doing this for the Overread, see below:
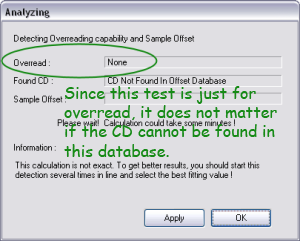
xuncat's EAC 0.99 guide says:
Check "Overread Lead-In and Lead-Out" only if the test result says that your drive can overread from both the Lead-In and Lead-Out, or if it says Lead-Out and your offset correction is positive, or if it says Lead-In and your offset correction is negative. Otherwise disable (uncheck) it.
Remember to check "Use AccurateRip with this drive" again once you're finished.
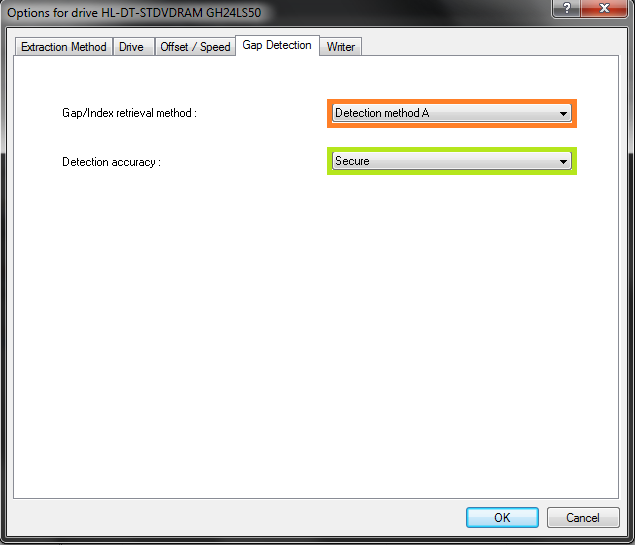
Pretty much every drive should work with the settings shown. If yours stalls on detecting gaps or detects gaps that are obviously wrong (like 30 second gaps on a non-live album), try Detection method B or C. If A, B, and C all fail, you can switch "Secure" to "Accurate" and try again.
Step 5: Metadata Options
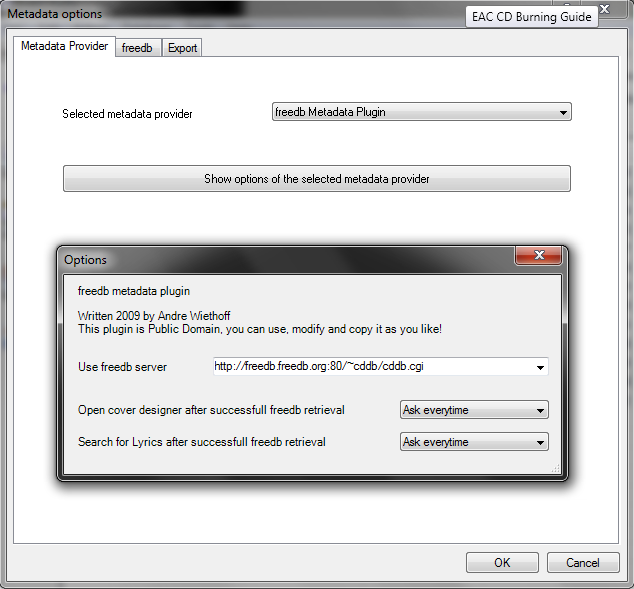
Here's where you pick your metadata provider. If you did install GD3, it'll be in the list. You can only rip 10 discs before you have to pay for a subscription though. Otherwise, you have a choice between the CUETools DB plugin, freedb plugin and EAC's native freedb support. With the latter two freedb choices, the difference is unclear.
CUETools DB plugin is recommended due to its use of multiple databases in its metadata queries (Discogs, Musicbrainz and freedb). If selected, be sure to click "show options" and select "extensive" under Metadata search mode and "Large" for Covers search mode.
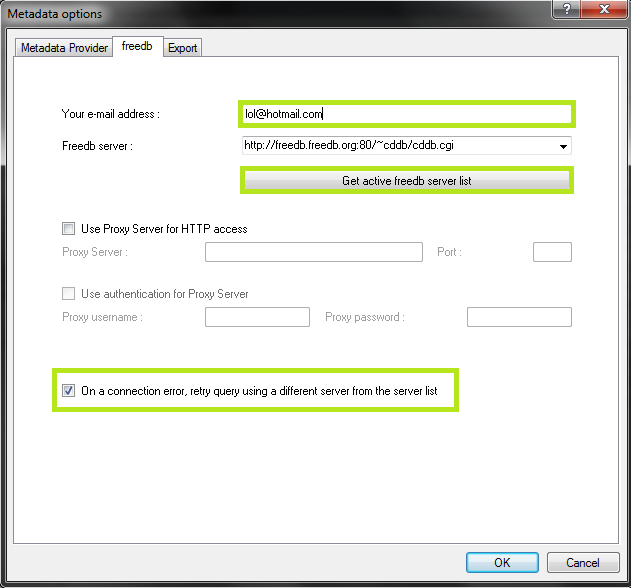
If you use EAC's native freedb instead, the settings should look like this. Make sure you put an email at the top, it doesn't need to be real. Hit "Get active freedb server list". Then checkmark the last option. However, the freedb servers have been shut down permanently in June 2020. As an alternative, the following URL of gnudb.org can be used in place of freedb:
http://gnudb.gnudb.org:80/~cddb/cddb.cgiStep 6: Compression Options
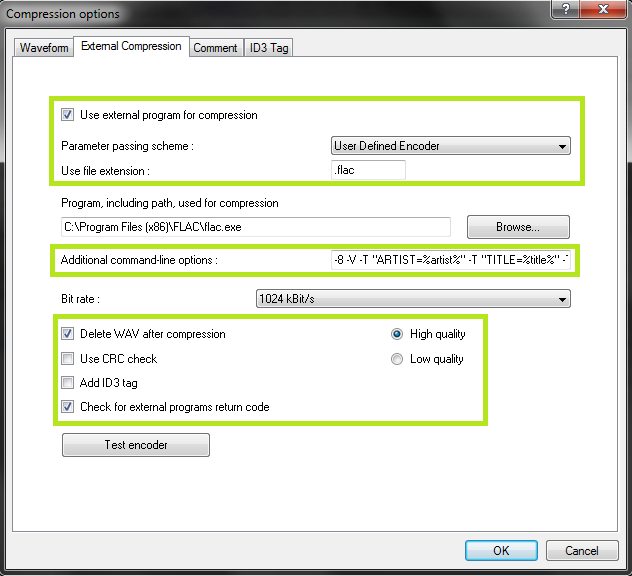
Set up this tab exactly as shown. You'll have to browse to the path where you have flac.exe, if you installed it with EAC it's in C:\Program Files (x86)\Exact Audio Copy\FLAC\flac.exe. If you installed it separately it's wherever you installed it. The bit rate and high/low quality have no effect on the rip.
The commandline parameters have changed in this version, so this will look new to most of you.
For EAC 1.3 the commandline parameters recommended for optimal completeness is this:
-8 -V -T "ARTIST=%artist%" -T "TITLE=%title%" -T "ALBUM=%albumtitle%" -T "DATE=%year%" -T "TRACKNUMBER=%tracknr%" -T "GENRE=%genre%" -T "PERFORMER=%albuminterpret%" -T "COMPOSER=%composer%" %haslyrics%--tag-from-file=LYRICS="%lyricsfile%"%haslyrics% -T "ALBUMARTIST=%albumartist%" -T "DISCNUMBER=%cdnumber%" -T "TOTALDISCS=%totalcds%" -T "TOTALTRACKS=%numtracks%" -T "COMMENT=%comment%" %source% -o %dest%The above parameters can cause EAC 1.5 to fail at the end of the ripping process. For EAC 1.5 use these commandline parameters:
-8 -V -T "ARTIST=%artist%" -T "TITLE=%title%" -T "ALBUM=%albumtitle%" -T "DATE=%year%" -T "TRACKNUMBER=%tracknr%" -T "GENRE=%genre%" -T "PERFORMER=%albuminterpret%" -T "COMPOSER=%composer%" -T "ALBUMARTIST=%albumartist%" -T "DISCNUMBER=%cdnumber%" -T "TOTALDISCS=%totalcds%" -T "TOTALTRACKS=%numtracks%" -T "COMMENT=%comment%" %source% -o %dest%It takes no extra effort on your part, just copy and paste that into the additional commandline options and you're done.
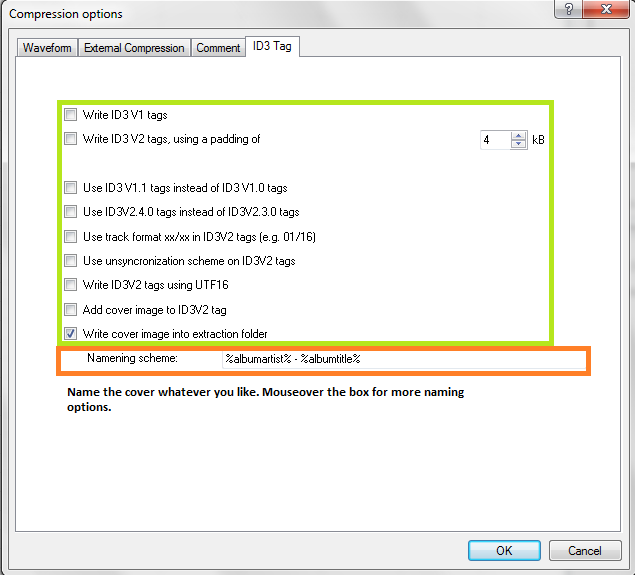
Leave everything unchecked except the last option.
Congrats! EAC is now properly set up! You may wish to save your settings in a profile by hitting "New" at the bottom of the screen. However, unless you're changing your settings frequently there's no need, EAC will remember all of this on next launch regardless.
Now that EAC is set up, move on to the EAC Ripping Guide for the steps needed on each rip to create perfect logs.
How to Install and Setup EAC to Make Flawless Rips on Linux
REDACTED.ch Wiki article imported on 15-02-2023
Running EAC in Wine is currently the only way to get 100% logs on Linux. Ripping with a virtual drive, from a virtual machine (such as VirtualBox or VMWare) will not produce verifiable logs. Any torrents ripped from inside a virtual machine will have their logs removed from the site, and the torrent will be equivalent to logless. (An exception applies if using a USB disc drive through a virtual machine, as these have their names correctly displayed on logs. Please double check such logs before uploading though, and also make sure that EAC is set up accordingly to the wiki articles linked at the bottom of the page to avoid deductions for incorrect rip settings.)
These directions should work under any flavor of Linux that runs Wine. This guide was written with Debian testing in mind, but the only things which should differ between distributions are the package manager commands - please adapt them to the distro you're running.
Install Wine
The first step is to install Wine.
It is highly recommended to use Wine 4.6 or newer, since it is the first version which enables plugin support in EAC. This will allow you to produce logs which include the CUETools report for your rip.
Via your distribution's package manager
You should use your distribution's packages if it provides them. However, the Wine project provides builds for a few distributions, so you may choose to use their builds if the package in your distribution is older or unusable for any other reasons. At the time of writing, Debian provides version 4.0 in their repositories - which is a little too old for this particular use case due to the reason mentioned above. Luckily, installing the package from the Wine repositories can be done with just a few commands:
wget https://download.opensuse.org/repositories/Emulators:/Wine:/Debian/Debian_Testing_standard/amd64/libfaudio0_19.04-0~buster_amd64.deb wget https://download.opensuse.org/repositories/Emulators:/Wine:/Debian/Debian_Testing_standard/i386/libfaudio0_19.04-0~buster_i386.deb sudo dpkg --add-architecture i386 sudo dpkg -i libfaudio0_19.04-0~buster_amd64.deb sudo dpkg -i libfaudio0_19.04-0~buster_i386.deb wget -O - https://dl.winehq.org/wine-builds/winehq.key | sudo apt-key add echo 'deb https://dl.winehq.org/wine-builds/debian/ testing main' | sudo tee -a /etc/apt/sources.list >/dev/null sudo apt update sudo apt install --install-recommends winehq-devel winetricksVisit the Wine project's page concerning their Debian builds if something doesn't work properly.
Making a custom Wine build
If, for some reason, you cannot use the newer versions, consider making a custom Wine build of an older version with a patch enabling EAC's plugin support. This is a slightly adapted version of what's available on the Wine wiki about making builds on Debian. Keep in mind that due to differences in how distributions handle the issue of multiple architecture libraries, this part of the guide is meant exclusively for Debian.
First of all, download the needed chroot machinery from the repositories and edit the configuration file :
sudo apt-get install schroot debootstrap sudo nano /etc/schroot/chroot.d/debian_i386.confHere are the contents of mine :
[debian_i386]
description=Debian Unstable 32-Bit
personality=linux32
directory=/srv/chroot/debian_i386
root-users=foobar
type=directory
users=foobar
Prepare the chroot so you can download the packages and enter it :
sudo mkdir -p /srv/chroot/debian_i386 sudo debootstrap --variant=buildd --arch=i386 testing /srv/chroot/debian_i386 http://ftp.debian.org/debian sudo cp /etc/apt/sources.list /srv/chroot/debian_i386/etc/apt/ schroot -c debian_i386 -u rootYou are now logged in as root inside the 32-bit chroot.
apt-get update apt-get install build-essential wget apt-get build-dep libwineexitThose commands will make sure you have the stuff that you need to compile wine in the 32-bit chroot, as well as build dependencies of the libwine package provided in the repositories so Wine compiles with all the optional features that you might or might not need. You can now re-enter the chroot as a regular user to perform the build :
schroot -c debian_i386 cd /home/foobar # this will enter /home/foobar in your host system wget https://dl.winehq.org/wine/source/4.0/wine-4.0.tar.xz tar xf wine-4.0.tar.xz wget -O wine-sxs-support.patch https://source.winehq.org/patches/data/150654 cd wine-4.0 patch -p1 -i ../wine-sxs-support.patch mkdir -p /home/foobar/wine-install ./configure --prefix=/home/foobar/wine-install make # optionally add -jN where N is the number of cores make installexitAnd voila! You're back to your regular system and the 32-bit Wine installation is now available in /home/foobar/wine-install. You still need to install the 32-bit support packages on your host system in order to actually run it, though :
sudo dpkg --add-architecture i386 # in case you haven't done this before sudo apt-get install libwine:i386This will install the libwine package and all its dependencies, which means that you end up with the same set of packages that Wine was compiled against in your 32-bit chroot. Remember to add the location into your PATH so the Wine binaries can be easily called from the shell and found by other tools :
export PATH="/home/foobar/wine-install/bin:$PATH"Let Wine see your optical drives
Wine needs the optical drives to be referenced in /etc/fstab in other to see them. The drives themselves don't need to be mounted, but the mount points do need to exist. Your optical drive's device node is most probably /dev/sr0 if you only have one drive - if you have multiple, list the entries inside /dev/disk/by-id to find out which drive maps to which device node :
$ ll /dev/disk/by-id/* lrwxrwxrwx 1 root root 9 Apr 6 23:08 /dev/disk/by-id/ata-LITE-ON_LTR-52327S -> ../../sr1 lrwxrwxrwx 1 root root 9 Mar 27 21:29 /dev/disk/by-id/ata-TSSTcorpCD_DVDW_SH-W162C -> ../../sr0Now, create an entry inside /etc/fstab for each drive that you want to use, changing the device path (first token) and the mount point (second token) appropriately :
echo '/dev/sr0 /mnt/drive0 auto ro,user,noauto,unhide 0 0' | sudo tee -a /etc/fstab >/dev/nullDon't forget to actually create the mount points that /etc/fstab now references :
sudo mkdir -p /mnt/drive0You will also need to give optical drive read/write permissions to the user you're running Wine as. Linux distributions usually give these permissions to particular groups - in order to see which group you need to be a member of, check the owner of the device node representing the device that you want to use :
$ ll /dev/sr* brw-rw---- 1 root cdrom 11, 0 Mar 27 21:29 /dev/sr0 brw-rw---- 1 root cdrom 11, 1 Apr 6 23:08 /dev/sr1As you can see, Debian gives R/W permissions to these device nodes to members of the "cdrom" group. It's thus enough to add your user ("foobar" in this example) to this group :
sudo gpasswd -a foobar cdromMake an exclusive EAC prefix
Wine operates in what it calls "Wine prefixes". Each prefix is essentially a separate Windows installation as far as Windows programs are concerned. It is usually recommended to have a separate prefix for every application installed, since this allows to isolate all the application-dependent workarounds which might be necessary, and make sure that they won't be influenced by any other applications installed into this particular prefix.
Making a Wine prefix boils down to creating a separate directory and setting two environment variables :
mkdir /home/foobar/.eac-prefix export WINEPREFIX=/home/foobar/.eac-prefix export WINEARCH=win32Remember to set the WINEPREFIX variable every time you want to run applications from that prefix, or modify it in any way. If you fail to do that, Wine will run with the default prefix of $HOME/.wine, which might contain other applications and settings which could possibly conflict with EAC. The WINEARCH variable is only needed for the first run inside a given prefix in order to set it up as 32-bit only due to .NET 2.0 bugs occurring in 64-bit prefixes.
Configure the EAC prefix
You should now be able to run
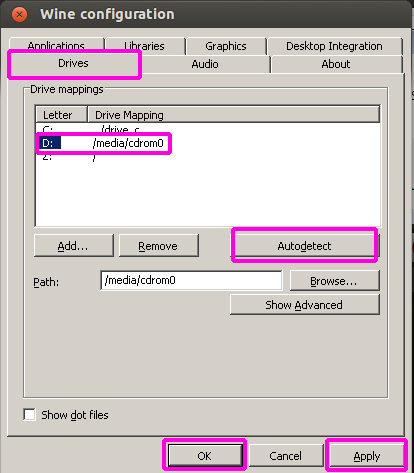
winecfgand see the Wine configuration window. First of all, change the Windows version to 7 in the bottom part of the window. Then, click on the "Drives" tab, and click "Autodetect". The table should fill with all drives Wine could find referenced in /etc/fstab : if you've done everything properly, you should also see your optical drives' mount points with Windows drive letters assigned to them.
If you want to, you can remove the drive letters referring to mount points which aren't your optical drives (except drive C referring to the virtual "drive C" inside the EAC prefix), but it's not necessary.
Here's how the window should look like if everything's OK (do note that the mount point in the screenshot is /media/cdrom0, expect to see the one you've used instead) :
Install .NET 2.0, .NET 4.0 and Visual C++ 2008
EAC does not work with the alternative .NET implementation called Mono, so we're going to use the helper script called winetricks, which allows installing additional components produced by Microsoft that provide functionality not yet implemented in Wine. In this particular case, this is necessary in order to install the Microsoft .NET 2.0 Framework package.
Winetricks might be provided by your distribution's packages, but it can just as easily be downloaded straight from Github :
wget https://raw.githubusercontent.com/Winetricks/winetricks/master/src/winetricks chmod +x winetricksThen, tell the script to download the .NET 2.0 runtime, .NET 4.0 runtime and Visual C++ 2008 Redist. :
./winetricks dotnet20 ./winetricks dotnet40 ./winetricks vcrun2008Click through the installer's dialogs until it finishes.
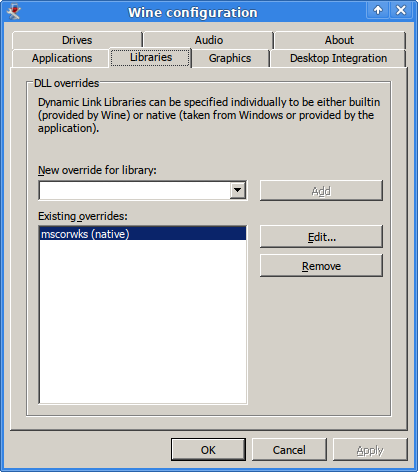
Activate the DLL override
Newer Wine versions have a modified implementation of one of the DLLs called mscorwks. Unfortunately, it causes issues when running some of the plugins available in EAC. It is thus necessary to disable the Wine implementation and always use the one installed by the dotnet20 package. This can be done in running
winecfgagain and going to the "Libraries" tab, typing "mscorwks" to the text field, and clicking "Add". The tab should look like this after all that :
Download and install EAC
The latest EAC version at the time of writing is 1.3, and can be downloaded from the official website. After downloading the installer, run it directly with :
wine eac-1.3.exeClick through the installer's dialogs until it finishes. Uncheck "Run Exact Audio Copy" in the last dialog, though, since there is still one thing before actually running EAC.
Running EAC
EAC is run from inside the Microsoft.VC80.CRT directory inside its installation directory via the Windows shortcut, which is most probably done in order for it to load the appropriate runtime DLL. This behaviour should be preserved when running EAC via Wine - I use the following Bash function to do just that :
function eac {
  local wineprefix="$HOME/.eac-prefix"
  local eacdir="${wineprefix}/drive_c/Program Files/Exact Audio Copy"
  pushd "${eacdir}/Microsoft.VC80.CRT"
  WINEPREFIX=$wineprefix WINEDEBUG=-all wine "${eacdir}/EAC.exe"
  popd
}
This assumes that you've installed EAC to its default directory and the EAC prefix is the same one as the one used throughout this guide. If you add this function to your .bashrc file, you'll be able to simply start EAC by running the command "eac" in your shell, which I recommend doing.
How to Flawlessly Use EAC to Rip on Windows
REDACTED.ch Wiki article imported on 15-02-2023
This guide details the steps you must take for each disc you rip. Before you continue, make sure you have configured EAC according to the EAC Setup Guide.
This guide was made for EAC version 1.0 beta 2 and will not completely work with earlier versions. Versions 0.99 or earlier should use the blowfish guide.
Anything with a green outline around it is a required setting. Anything orange is required but depends on your drive. Anything unmarked is optional.
This is meant to be a no-frills guide with little extra info. A more comprehensive (but outdated) guide can be found here:
http://www.afterdawn.com/guides/archive/rip_cds_with_exact_audio_copy.cfm
Step 1: Tagging
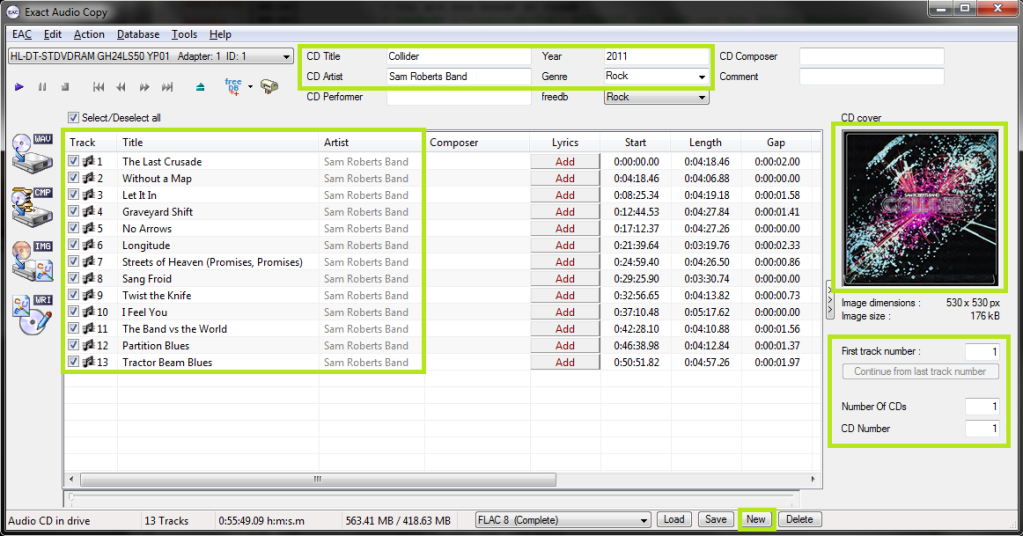
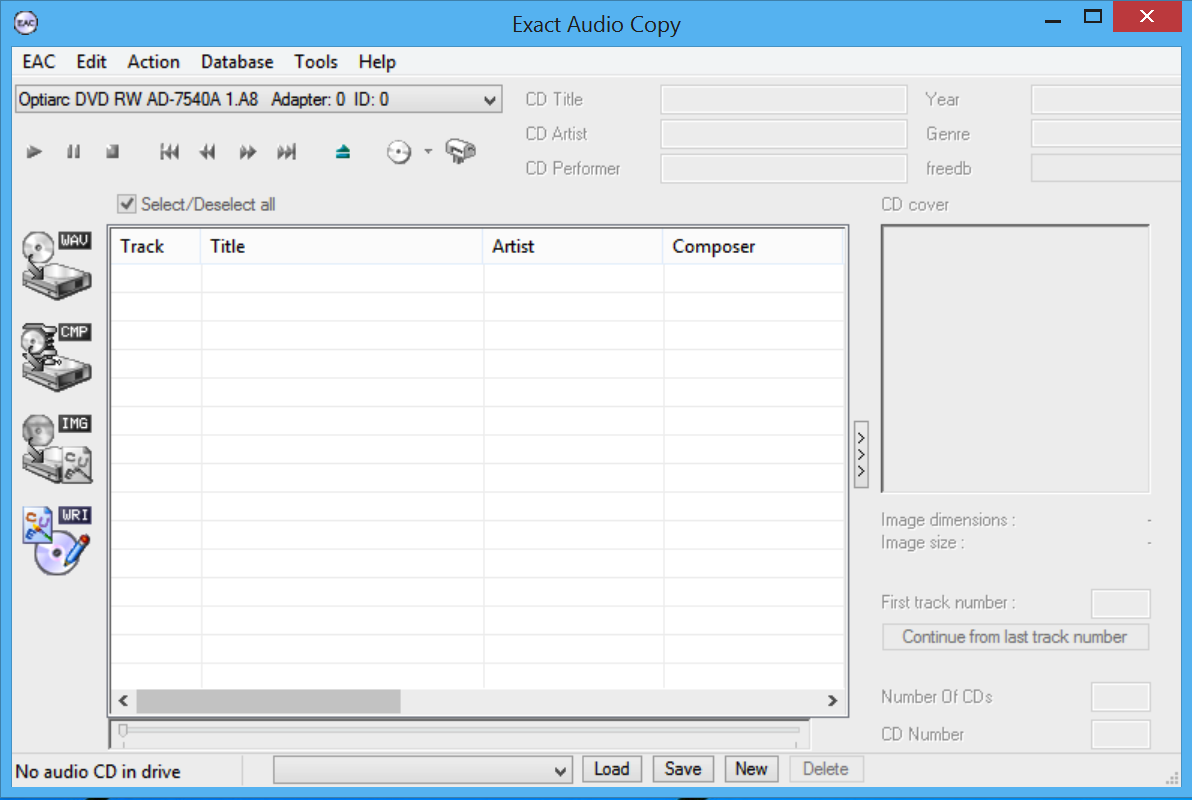
So now let's look at the main window. Be sure everything is named correctly here, as these will be the tags on your ripped files. If you're ripping a classical CD, you may wish to fill in the Composer/Performer fields. Also note: the Comment field doesn't currently work.
Drag a cover image into the EAC window. I think ~500x500 is a decent size in most cases. Google images is your friend here.
If you're ripping a box set, you may wish to use the options under the cover image, otherwise leave them all as "1".
Finally, if you want to add lyrics to the tracks, use the "Lyrics" button.
Note: I've also highlighted the "New" button where you can save your settings. This is not a necessary step each time you rip.
Step 2: Gap Detection and Cuesheets
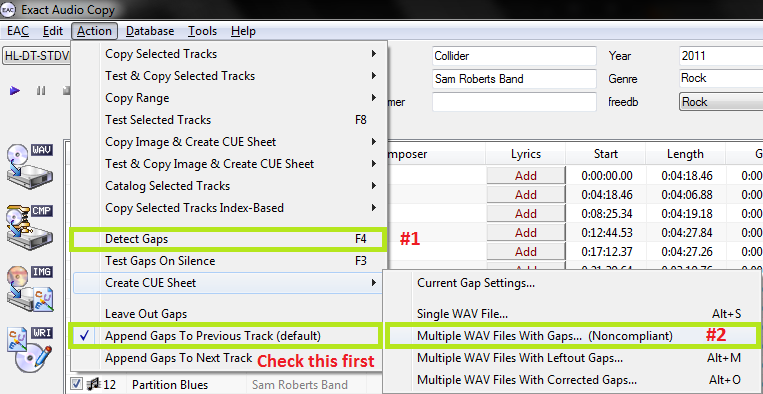
The pre-rip stuff happens here. Make sure "Append Gaps to Previous Track (default)" is checked. It should be. Next, hit the options in the order shown.
First, hit "Detect Gaps". This is very important, your rip will fail the logchecker if you do not complete this step. If the first track is highlighted in red, you have a hidden track. You'll want to look at this wiki article: EAC - Ripping pre-gap hidden tracks (HTOA).
Next, go to Create CUE Sheet -> Multiple WAV Files With Gaps... (Noncompliant). This is usually where I create the folder for ripping as well. Do NOT rip your tracks to any directory containing your name. You should NEVER edit a log for any reason, especially now that we have checksums. A simple C:\EAC Rips is fine.
I name my directories as follows:
Artist - Album (Year) [Format] {Extra}
So for example, with the album in the screenshots, it'd be
Sam Roberts Band - Collider (2011) [FLAC] {UMC 0252764577}
However, as long as it contains the album name and no nested folders (don't do \Artist\Album\), you're fine by the rules here.
Anyway, make the folder, save the .cue file into it. I usually just name mine Noncompliant.cue, it doesn't really matter.
Step 3: Ripping
Finally, the rip itself! Make sure all the tracks are checkmarked in the main window unless there are some you don't want to rip.
Test & Copy -> Compressed.
Depending on your drive and whether or not the CD is scratched, this could take anywhere from ten minutes to four hours. Be patient.
Step 4: Post-Rip
So you're done! You may wish to use logchecker.php to check and make sure your rip is proper, but if you followed this guide, the only possible errors would be with the CD itself. It does happen... some CDs are too badly damaged, even for EAC. Your best bet is to clean the CD and try again.
Other than that, it never hurts to make sure your files are tagged and named properly (though they should be). Any extra stuff you want to include should be added now as well... Additional artwork, an md5 fingerprint, an info.txt file, that sort of thing. If you don't want to do any of that, it's time to find yourself an uploading guide!
Checking Log Integrity with CheckLog.exe
You can only check EAC logs with the EAC CheckLog.exe utility; XLD logs must be checked with XLD (or the Windows utility for checking XLD log files.)
To check the integrity of an EAC log, do the following:
- Open Windows Explorer and navigate to the folder where the log file is stored.
- Open Windows Explorer and navigate to the folder where EAC is installed. (Typically C:\Program Files (x86)\Exact Audio Copy or C:\Program Files\Exact Audio Copy on 32bit Windows.)
- Make a copy of the log file to be tested, inside the EAC folder.
- Open a Command Prompt window (press the Start button and type "command" and click on "Command Prompt" from the list above.)
- In the Command Prompt window, change directories to the EAC folder by typing or copying/pasting* cd\Program Files (x86)\Exact Audio Copy (or wherever EAC is installed) and press Enter (*Right-click to paste inside the Command Prompt, rather than pressing Ctrl+V.). Alternatively, when viewing the EAC folder, press Shift+Right-Click and choose "Open command window here". This will open a new command prompt window that will already be loaded in the EAC folder directory.
- Type checklog, space, and type/copy+paste the full name of the log file (enclose its file name in double-quotation marks if it includes any spaces) and press Enter. Ex: checklog "Some Band - Some Album.log" ENTER
- (Alternatively, instead of copying the log file over, you can just paste the full path to the original log file, including the file name and extension, and enclose it all in double-quotation marks, if the UAC prompts are annoying. Ex: checklog "E:\Path\To\Torrent\Folder\Some Band - Some Album.log" ENTER)
- It will output a line Log Integrity Checker (C) 2010 by Andre Wiethoff and then another, which will either display 1. Log entry is fine! or 1. Log entry was modified, checksum incorrect! - the latter means it's been edited/forged, the former means it checks out okay.
- If you discover an EAC log from a torrent you snatched fails this test, then you should report that torrent for the reason Edited Log and explain that it failed to pass EAC's checklog utility.
Ripping Pre-Gap Hidden Tracks (HTOA)
REDACTED.ch Wiki article imported on 15-02-2023
1. Introduction
1. A track may contain an additional song, that is not listed in the tracklist. It is thus is "hidden" until you listen to the full track. When you rip a CD with such a "hidden song", you need to consider if you should edit the track title so that it shows both songs ("SongtitleOne and SongtitleTwo"), or if you should let the song remain "hidden".
2. A song (or other audio data) may be "hidden" in the gap between tracks. If you play through a CD with such "hidden" songs, you will of course hear them, but if you skip straight to a song you will not hear any song that is hidden in the gap preceding that song. If you rip a CD with such "hidden songs" the way recommended here, they will be placed at the end of the previous track, since gaps are appended to the previous tracks. If you burn an audio CD from the rip, using the cue sheet as detailed in EAC CD Burning Guide, it will behave just like the original CD: you will only hear the hidden songs if you let the CD play on after the previous track has finished.
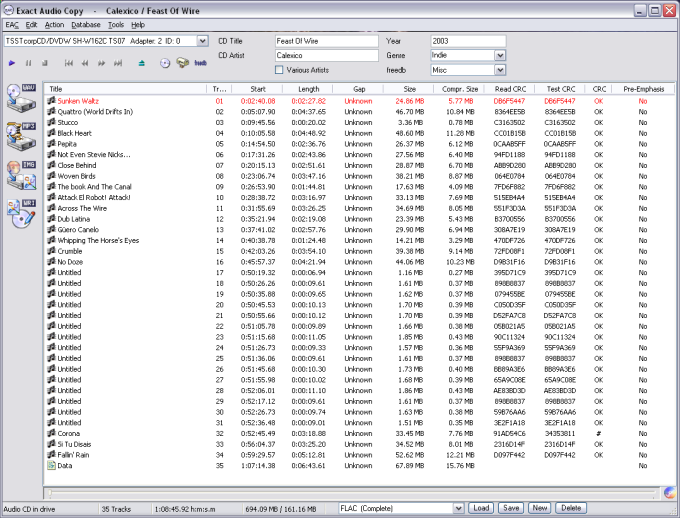
3. One or more songs may be preceded by blank tracks, like the bonus songs on tracks 32-34 below. If you listen to such a CD on a stand-alone player, you will either patiently have to wait through all the blank tracks, or skip to tracks 32-34 in order to hear them. If you rip a CD with blank tracks like these, simply leave them in place. If you delete them, your copy will no longer be an exact copy of the CD. (There is a CRC mismatch for track 32, "Corona" here. No matter how many times I tried, I never could get it to rip properly.)
4. A song (or, indeed, more than one song) may be hidden in the pregap of the first track of the CD. You will never hear this kind of hidden song when playing the CD on a stand-alone player unless you start playing the first track and then rewind into the pregap. The red colour of the first track below indicates the presence of such a hidden song. This is the kind of "hidden track" that needs special treatment when you rip a CD. All the other varieties of "hidden songs" are automatically included in a normal rip. A song that is hidden in the first pregap will, however, not be ripped normally by EAC. The song listed for the first track will, despite its red colour, rip normally. The colour is just a "signal" that there is more to that track than EAC can handle doing "business as usual".
2. Failed Ripping Attempt
Not all drives are capable of ripping songs that are hidden in the first pregap. I tried ripping the hidden song shown above with the drive shown in the EAC window above. It looked like EAC was ripping the song, but the error correction was constantly lighting up, and in the end there was a problem: the drive refused to rip into the last two seconds before the official first track, that would be the normal pregap according to the Redbook standard for CDs.
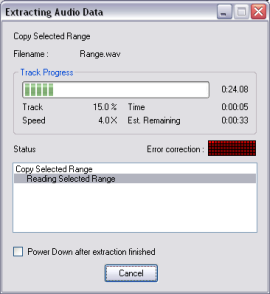
Ripping process:
Log extract:
Range status and errors

Selected range (Sectors 0-12005)

Filename C:\EACrips\Calexico - Feast Of Wire\Range.wav

Suspicious position 0:02:38

Peak level 72.0 %
Range quality 96.9 %
Copy CRC C2154821
Copy finished

There were errors

AccurateRip summary

No tracks could be verified as accurate

End of status report
Wave form:
This shows that the hidden song was not ripped at all (the file is only 146 kB). There is no audio data in the file, apart from the first second of the official first song that shows at the end of the rip. (The offical first song thus starts a bit abruptly on the CD, but not enough so that it would in itself make you suspect that there might be audio data in the pregap.)

So, if you are unlucky, your drive may simply not be capable of ripping this kind of hidden song. If you have more than one drive, try them all. The one that I use for the rest of this tutorial is an old pretty non-descript A-Open drive that quite surprisingly turned out to have this ripping capacity.
3. Ripping Hidden Songs: Two Different Methods
There are two different ways in which you can rip songs hidden in the first pregap: range-based and index-based ripping. This guide will only cover range-based ripping, which can be done with EAC 0.99 and up.
It is not possible to do a test-and-copy rip with any of the methods. There is, however, one important difference between the methods: EAC calculates a CRC value for range-based rips, but not for index-based rips. That difference makes range-based rips preferable to index-based rips.
Index-based ripping used to be the accepted way of extracting hidden tracks all the same, since it was difficult to establish which range you should rip with old EAC 0.95. Index-based ripping is not recommended anymore, but if you wish to learn more for historical purposes, you may read the section at http://xunside.info/eac/Rip/rip11-hidden.html.
4. Range-Based Ripping
Assuming that you use EAC 0.99: start by ripping the CD as usual. All the tracks that show in the EAC main window will be ripped as usual.
- When the normal rip is done, open the log file and check the TOC (Table of Contents) that EAC 0.99 writes to the log file:
TOC of the extracted CD
Track | Start | Length | Start sector | End sector
---------------------------------------------------------
1 | 1:59.00 | 5:35.20 | 8925 | 34069
2 | 7:34.20 | 4:25.50 | 34070 | 53994
3 | 11:59.70 | 4:37.20 | 53995 | 74789
4 | 16:37.15 | 3:03.60 | 74790 | 88574
5 | 19:41.00 | 4:23.40 | 88575 | 108339
6 | 24:04.40 | 5:59.55 | 108340 | 135319
7 | 30:04.20 | 4:14.47 | 135320 | 154416
8 | 34:18.67 | 4:05.40 | 154417 | 172831
9 | 38:24.32 | 5:15.28 | 172832 | 196484
10 | 43:39.60 | 8:58.15 | 196485 | 236849
The first track normally starts at sector 0. In this case, it starts at sector 8925. This tells you the range of the hidden song: it extends from sector 0 to sector 8924.
Choose "Copy Range ... Compressed" from the Action menu in EAC.
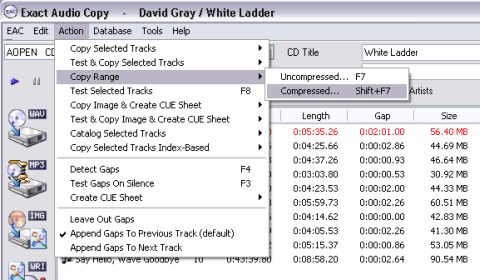
Leave the start block (= sector) at 0, but change the end block to one less than the value listed as "start sector" for the official first song of the CD. In this case, the end block should thus be 8924:
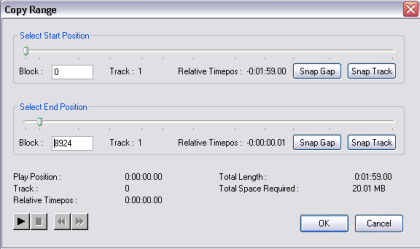
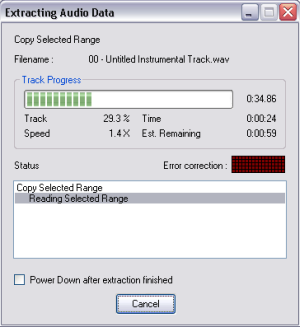
Click "OK", choose to save the track as (for example) "00 - Untitled Instrumental Track" (if that is what it is), and then watch EAC rip the selected range:
When the track (range) has finished ripping, immediately rip it again, the same way as detailed above. You can choose the same file name as before, and let EAC overwrite the first version of the file.
EAC will append the information about this second rip to the log called "00 - Untitled Instrumental Track.log" that it just created. By ripping the track twice, you can thus "test-and-copy" the track, and have two CRC values to compare. If all went well, the values will match. Here's an extract from the log file for such successful rips:
Exact Audio Copy V0.99 prebeta 4 from 23. January 2008

EAC extraction logfile from 5. June 2008, 0:49

David Gray / White Ladder

(...)

Range status and errors

Selected range (Sectors 0-8924)

Filename E:\00 - Untitled Instrumental Track.wav

Peak level 93.2 %
Range quality 100.0 %
Copy CRC D1C38987
Copy OK

No errors occurred

AccurateRip summary

No tracks could be verified as accurate

End of status report

------------------------------------------------------------

Exact Audio Copy V0.99 prebeta 4 from 23. January 2008

EAC extraction logfile from 5. June 2008, 0:51

David Gray / White Ladder

(...)

Range status and errors

Selected range (Sectors 0-8924)

Filename E:\00 - Untitled Instrumental Track.wav

Peak level 93.2 %
Range quality 100.0 %
Copy CRC D1C38987
Copy OK

No errors occurred

AccurateRip summary

No tracks could be verified as accurate

End of status report
Remember to check the tags when you have all the files in the album folder, using (for example) Tag&Rename or mp3Tag (freeware, that will handle FLAC tags/Vorbis comments, too, in spite of its name).
5. Editing the Cue Sheet: Create an "Exact Copy" Cue Sheet and a "Bonus Track" Cue Sheet
Now you have collected all the songs from the CD, getting the hidden song ripped either by performing a range-based rip or by performing an index-based rip. But, there is some more work to be done. The hidden song was not included in the normal ripping process, and is therefore not contained in the cue sheet for the CD. If you were to use the cue sheet "as is" for burning a copy of the CD, the hidden song would not be included.
If you want to be able to create an exact copy of the original CD, you need to edit that hidden song back as index 00 for the first track. You may want to create an alternative cue sheet, too. You may want to treat the hidden song as a bonus song and place it as a new last track on the cue sheet. Just like there are many drives that are not capable of ripping hidden tracks, there are many drives that are not capable of burning hidden tracks, and an "exact copy" cue sheet is of no use with such drives. A "bonus track" cue sheet can be used with practically any drive.
There are instructions below for how to create both an "exact copy" cue sheet and a "bonus track" cue sheet. I would recommend creating and saving both versions for your album.
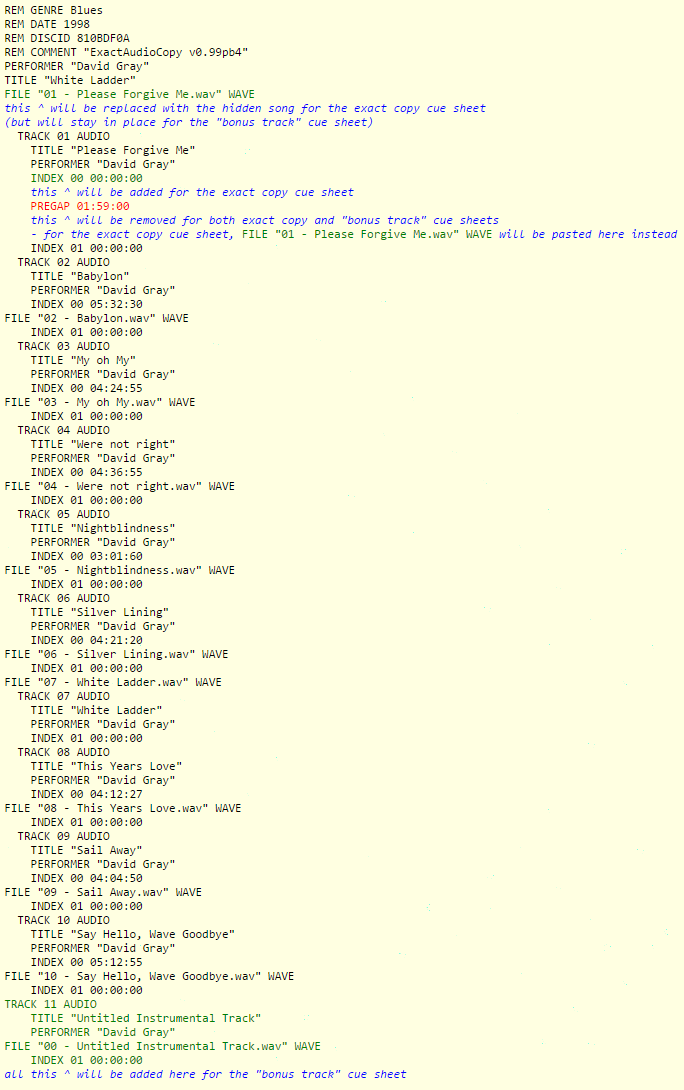
Here is the original cue sheet, with some colour markings and comments that show what will have to be changed in order to create cue sheets that contain the hidden song:
Exact Copy Cue Sheet
For the exact copy version of the cue sheet, you focus on track 1. You need to...
- Copy the line "FILE "01 - [Whatever the name of the first official song].wav" WAVE". Just let it stay copied in memory while you perform the next step - you will paste it in place of the pregap shortly.
- Edit the line "FILE "01 - [Whatever the name of the first official song].wav" WAVE" that you just copied, so that it says ""FILE "00 - [Whatever the name of the hidden song].wav" WAVE" instead. It is very important that the file name referenced in the cue sheet is exactly the same as the actual file name for the hidden track.
(That is true for all the file references, of course, but if you have made no changes to the file names, the rest of the files should automatically be correctly referenced.)
Replace the PREGAP line with a reference to file 01:
- Remove "PREGAP [whatever length the pregap had]".
- Paste "FILE "01 - [Whatever the name of the first official song].wav" WAVE" in the place where "PREGAP [whatever length the pregap had]" used to be.
- Add "INDEX 00 00:00:00" above the line "FILE "01 - [Whatever the name of the first official song].wav" WAVE", that now is where the pregap used to be.
- Save the edited cue sheet as "[Album name]_exact-copy.cue" or something similarly descriptive.
This is the final result:
REM GENRE Blues
REM DATE 1998
REM DISCID 810BDF0A
REM COMMENT "ExactAudioCopy v0.99pb4"
PERFORMER "David Gray"
TITLE "White Ladder"
FILE "00 - Untitled Instrumental Track.wav" WAVE
TRACK 01 AUDIO
TITLE "Please Forgive Me"
PERFORMER "David Gray"
INDEX 00 00:00:00
FILE "01 - Please Forgive Me.wav" WAVE
INDEX 01 00:00:00
TRACK 02 AUDIO
TITLE "Babylon"
PERFORMER "David Gray"
INDEX 00 05:32:30
FILE "02 - Babylon.wav" WAVE
INDEX 01 00:00:00
TRACK 03 AUDIO
TITLE "My oh My"
PERFORMER "David Gray"
INDEX 00 04:24:55
FILE "03 - My oh My.wav" WAVE
INDEX 01 00:00:00
TRACK 04 AUDIO
TITLE "Were not right"
PERFORMER "David Gray"
INDEX 00 04:36:55
FILE "04 - Were not right.wav" WAVE
INDEX 01 00:00:00
TRACK 05 AUDIO
TITLE "Nightblindness"
PERFORMER "David Gray"
INDEX 00 03:01:60
FILE "05 - Nightblindness.wav" WAVE
INDEX 01 00:00:00
TRACK 06 AUDIO
TITLE "Silver Lining"
PERFORMER "David Gray"
INDEX 00 04:21:20
FILE "06 - Silver Lining.wav" WAVE
INDEX 01 00:00:00
FILE "07 - White Ladder.wav" WAVE
TRACK 07 AUDIO
TITLE "White Ladder"
PERFORMER "David Gray"
INDEX 01 00:00:00
TRACK 08 AUDIO
TITLE "This Years Love"
PERFORMER "David Gray"
INDEX 00 04:12:27
FILE "08 - This Years Love.wav" WAVE
INDEX 01 00:00:00
TRACK 09 AUDIO
TITLE "Sail Away"
PERFORMER "David Gray"
INDEX 00 04:04:50
FILE "09 - Sail Away.wav" WAVE
INDEX 01 00:00:00
TRACK 10 AUDIO
TITLE "Say Hello, Wave Goodbye"
PERFORMER "David Gray"
INDEX 00 05:12:55
FILE "10 - Say Hello, Wave Goodbye.wav" WAVE
INDEX 01 00:00:00
"Bonus Track" Cue Sheet
For the "bonus track" version of the cue sheet, you need to...
- Remove the pregap ("PREGAP [length]") for track 01.
Add a last track (track 11 in this case) and make the hidden song file ("00 - Untitled Instrumental Track.wav" in this case) go there:
- Copy the details for the last track of the original cue sheet (no. 10 in this case), paste it below so that you have two entries for the last track. (The details start with "TRACK [no.] AUDIO", so you copy from there to the end.)
Edit the pasted details:
- Add +1 to "TRACK [no.] AUDIO". In this case, the result is "TRACK 11 AUDIO" since the last track was no. 10.
- Replace the file reference with a reference to the hidden song file. It is very important that the file name referenced in the cue sheet is exactly the same as the actual file name for the hidden track.
(That is true for all the file references, of course, but if you have made no changes to the file names, the rest of the files should automatically be correctly referenced.)
- If there is an "INDEX 00" for the track you copied, remove it from the details for this new last track.
Also, make sure that "INDEX 01" indeed says "INDEX 01 00:00:00" - it usually does.
- Save the edited cue sheet as "[Album name]_'bonus-track'.cue" or something similarly descriptive.
This is the final result; again, note that this is not a cue sheet that will allow you to burn an exact copy of the original CD, but on the other hand it will be usable with practically all drives:
REM GENRE Blues
REM DATE 1998
REM DISCID 810BDF0A
REM COMMENT "ExactAudioCopy v0.99pb4"
PERFORMER "David Gray"
TITLE "White Ladder"
FILE "01 - Please Forgive Me.wav" WAVE
TRACK 01 AUDIO
TITLE "Please Forgive Me"
PERFORMER "David Gray"
INDEX 01 00:00:00
TRACK 02 AUDIO
TITLE "Babylon"
PERFORMER "David Gray"
INDEX 00 05:32:30
FILE "02 - Babylon.wav" WAVE
INDEX 01 00:00:00
TRACK 03 AUDIO
TITLE "My oh My"
PERFORMER "David Gray"
INDEX 00 04:24:55
FILE "03 - My oh My.wav" WAVE
INDEX 01 00:00:00
TRACK 04 AUDIO
TITLE "Were not right"
PERFORMER "David Gray"
INDEX 00 04:36:55
FILE "04 - Were not right.wav" WAVE
INDEX 01 00:00:00
TRACK 05 AUDIO
TITLE "Nightblindness"
PERFORMER "David Gray"
INDEX 00 03:01:60
FILE "05 - Nightblindness.wav" WAVE
INDEX 01 00:00:00
TRACK 06 AUDIO
TITLE "Silver Lining"
PERFORMER "David Gray"
INDEX 00 04:21:20
FILE "06 - Silver Lining.wav" WAVE
INDEX 01 00:00:00
FILE "07 - White Ladder.wav" WAVE
TRACK 07 AUDIO
TITLE "White Ladder"
PERFORMER "David Gray"
INDEX 01 00:00:00
TRACK 08 AUDIO
TITLE "This Years Love"
PERFORMER "David Gray"
INDEX 00 04:12:27
FILE "08 - This Years Love.wav" WAVE
INDEX 01 00:00:00
TRACK 09 AUDIO
TITLE "Sail Away"
PERFORMER "David Gray"
INDEX 00 04:04:50
FILE "09 - Sail Away.wav" WAVE
INDEX 01 00:00:00
TRACK 10 AUDIO
TITLE "Say Hello, Wave Goodbye"
PERFORMER "David Gray"
INDEX 00 05:12:55
FILE "10 - Say Hello, Wave Goodbye.wav" WAVE
INDEX 01 00:00:00
TRACK 11 AUDIO
TITLE "Untitled Instrumental Track"
PERFORMER "David Gray"
FILE "00 - Untitled Instrumental Track.wav" WAVE
INDEX 01 00:00:00CD Burning Guide
REDACTED.ch Wiki article imported on 15-02-2023
So you've ripped your CDs and perhaps downloaded some other people's rips, but there's one last step involved in getting your nice 1:1 copy of your downloaded communism. The burning process is just as important as the ripping process, if your goal is perfection.
To burn a 1:1 copy from a properly ripped CD, there's one program you can use: Exact Audio Copy. It is the only program that can read (its own) non-compliant cuesheets and utilise write offsets. There is another program, Burrrn, which can read EAC's non-compliant cuesheets, but it CANNOT make use of a write offsets. (Hopefully, in the future, it will support this, as it is slightly more user-friendly.)
Create Offset CD
- To start, select the CD/DVD drive you will be using to burn your CDs.

- EAC > Drive Options...
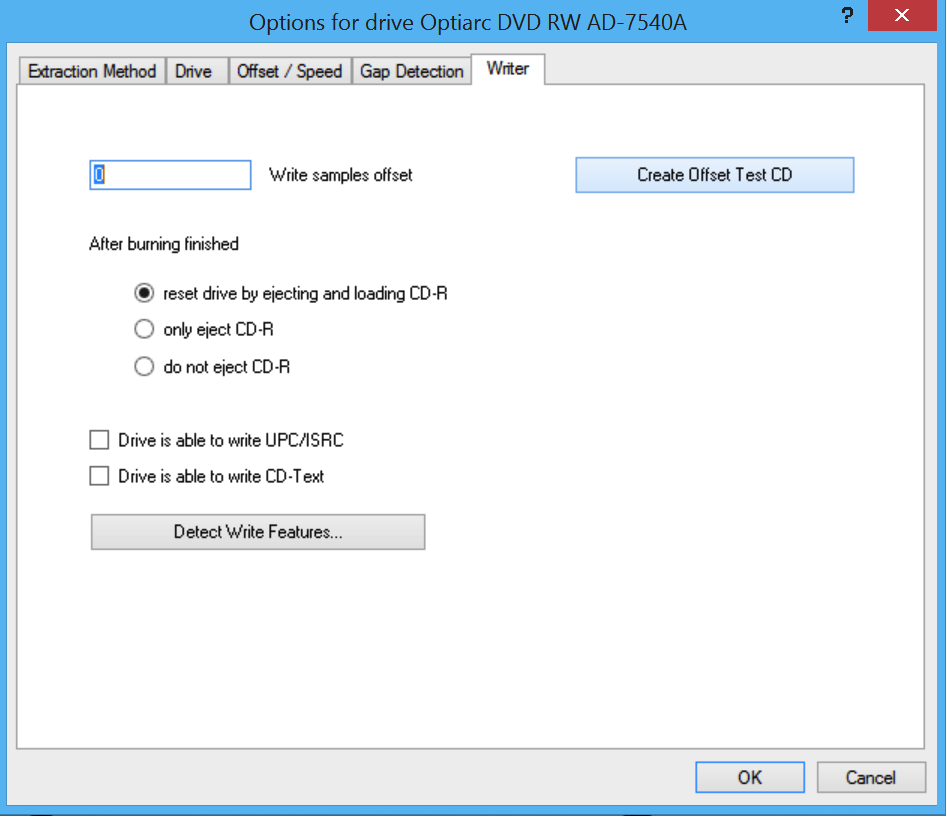
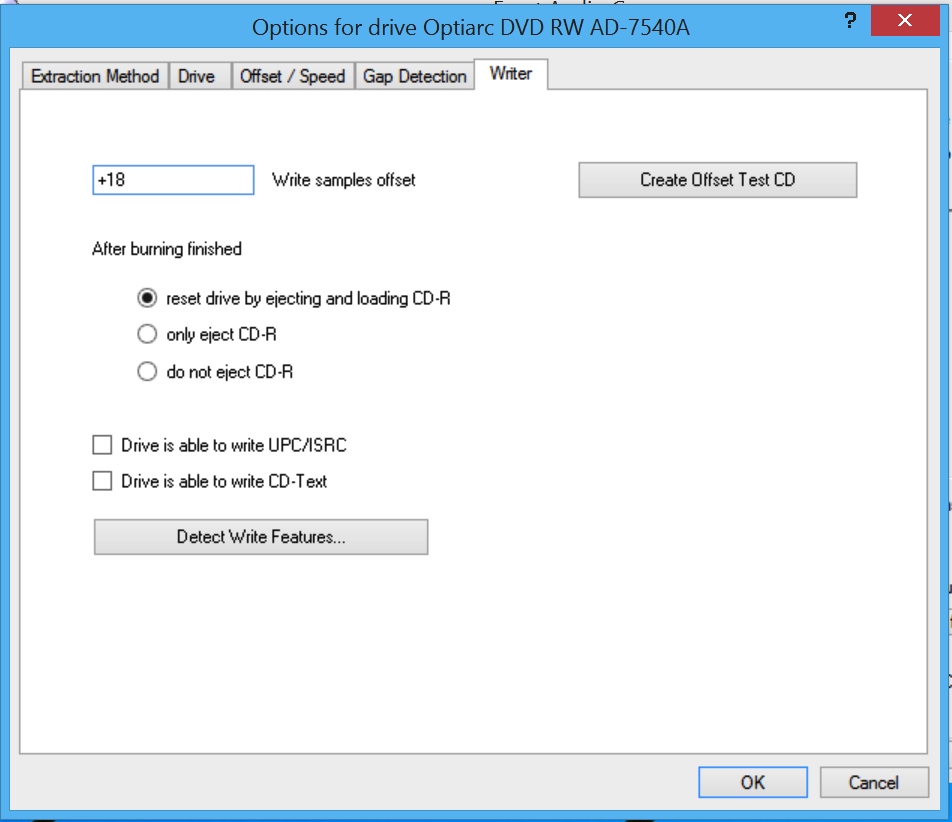
- Click on the Writer tab
- Enter a value of 0 in the Write Offset Samples field, click OK

- Insert your blank CD-RW or CD-R now. Keep in mind you will be writing to this CD, so take note of this in case you do not want to waste a CD-R on
- EAC > Drive Options...
- Click on the Writer tab
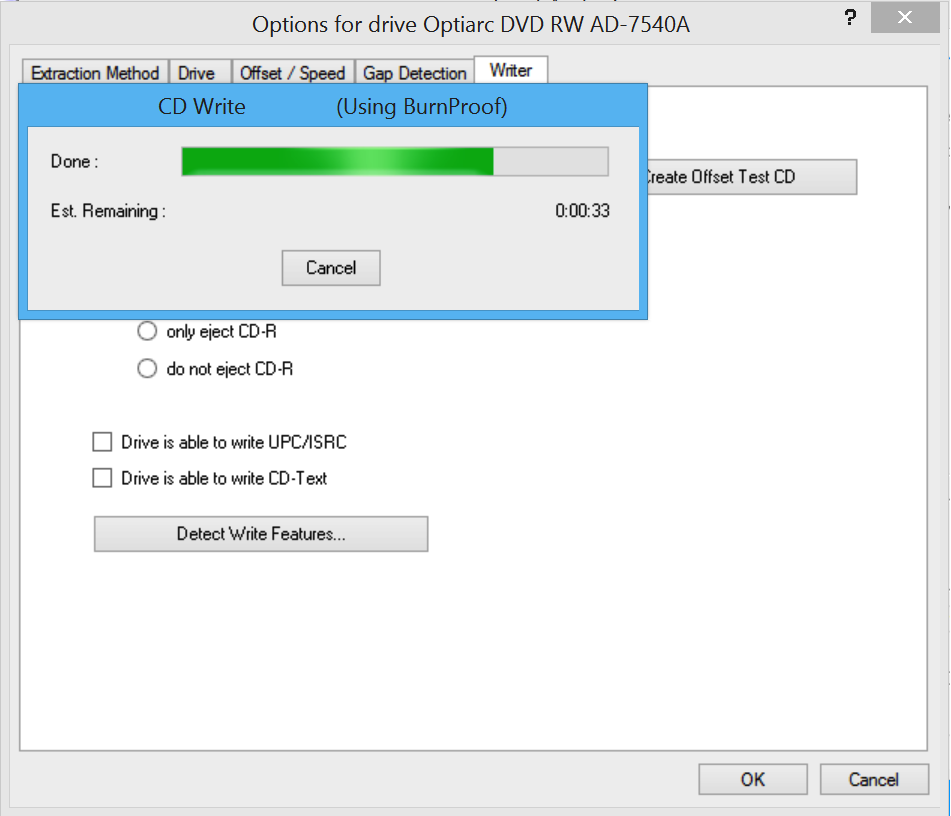
- Click on Create Offset Test CD.

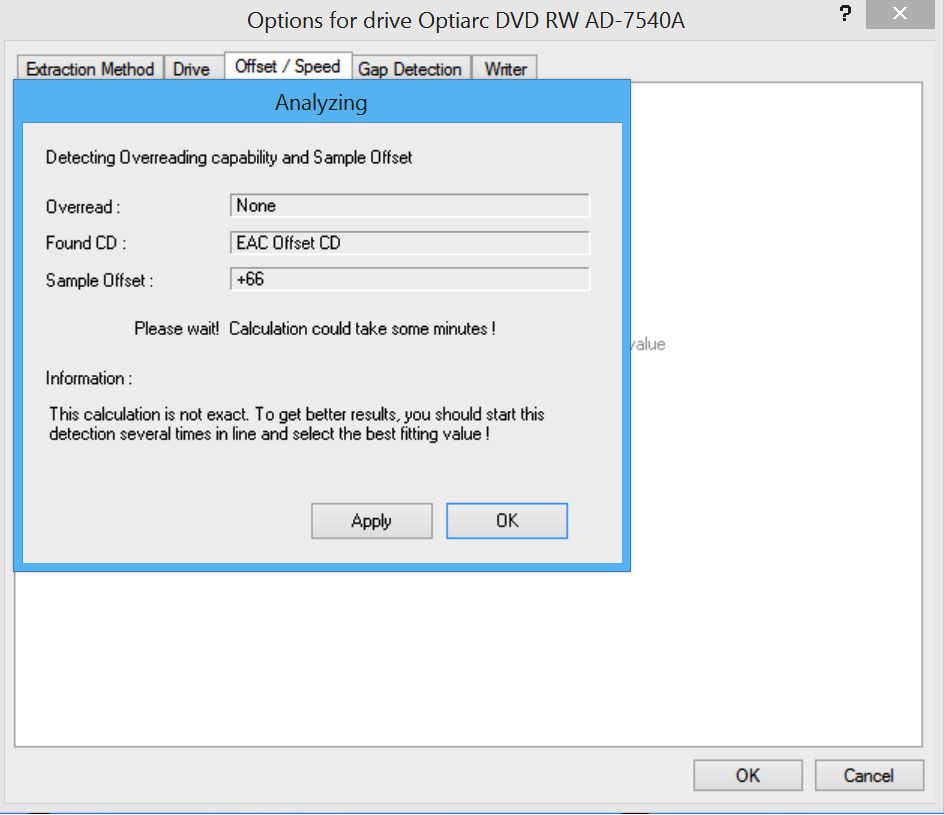
After the burn is complete, the CD-tray should eject and close again. If it doesn't, do this manually. - Now click on the Offset/Speed tab and then click on Detect read sample offset correction...

- You should be left with a sample offset. Click on OK, not Apply, as you should already have your actual read offset configured.
- Your correct Write samples offset is the number you just obtained minus your drive's Read sample offset. For example, +66 - 48 = 18. +18 is the write samples offset value. Keep in mind your value could be negative.
- Return to the Writer tab and enter that value in the field accordingly.

Burn CD
To double-check that your value is correct, the most simple method is to burn one of your own rips and re-rip it. Then, compare the CRC values from the logs to see if they match. If they do, then you are burning 1:1 copies of your rips. The burning process with EAC is rather self-explanatory :
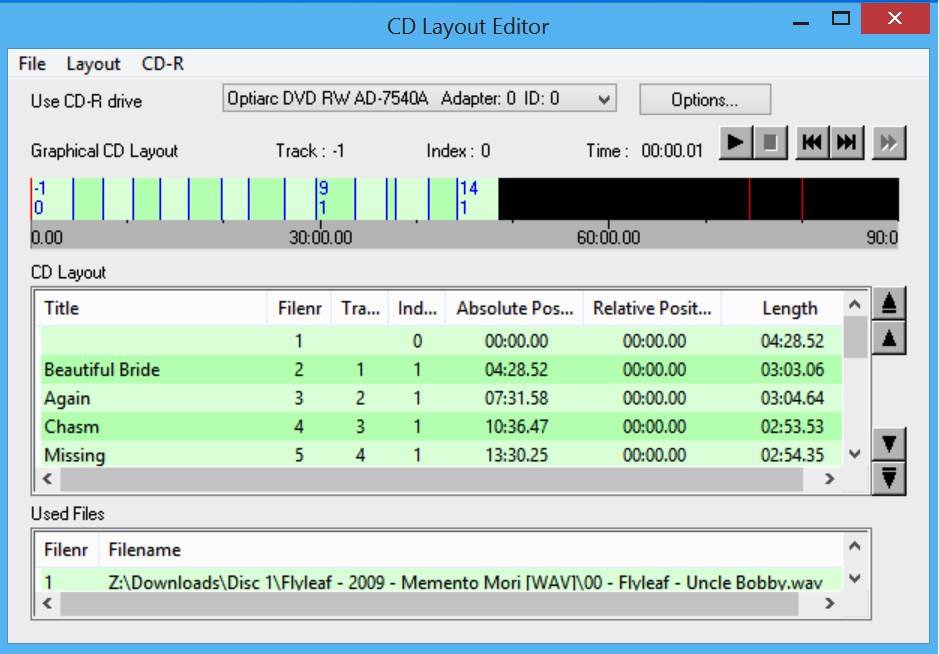
- Tools > Write CD-R

- If you're using the CD-RW you just used to detect your write offset, you might want to quick-erase it: CD-R > Quick-Erase CD-RW. If this doesn't work out then you probably have to do a full erase, which takes a while. There is other software that does this like Nero or Burrrn.
- Since your cuesheet will refer to .wav files, you have to decode your .flac/.wv/.ape/etc files to .wav files before you can burn them. You probably already know how to do this, so it won't be reviewed.
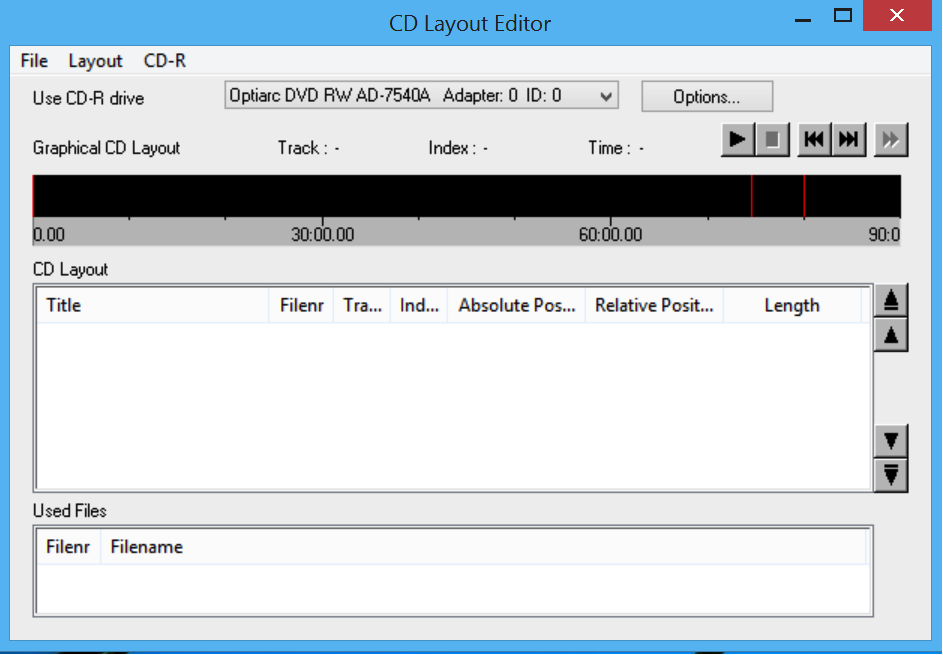
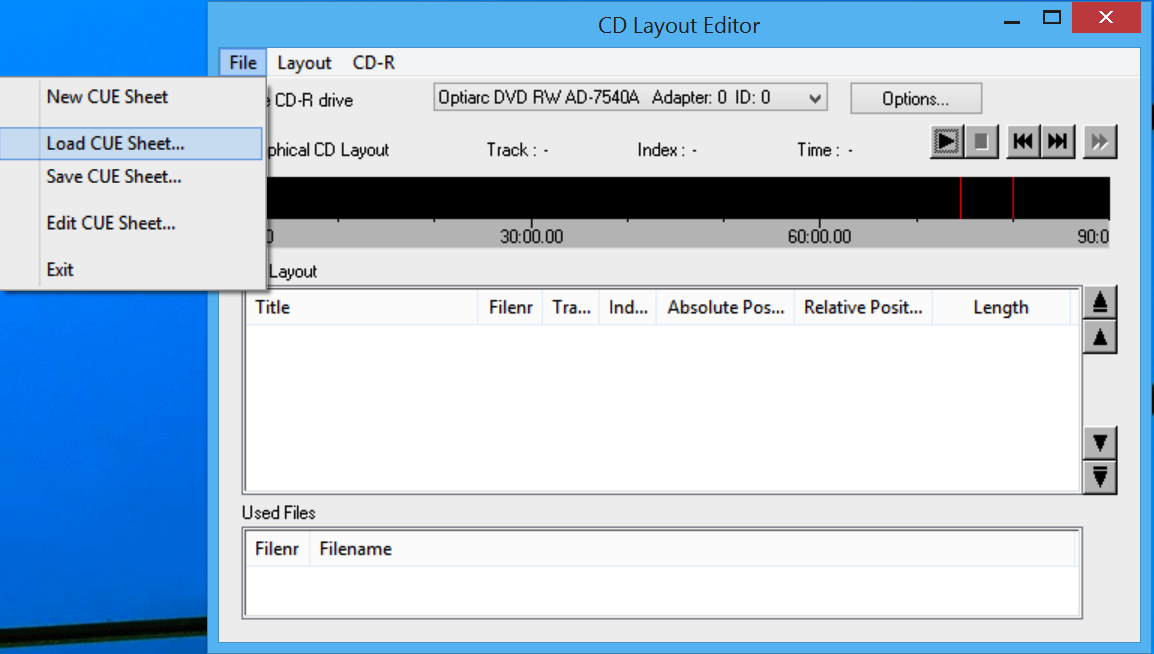
- After that's done, File > Load CUE sheet, then select the CUE sheet you're going to use.

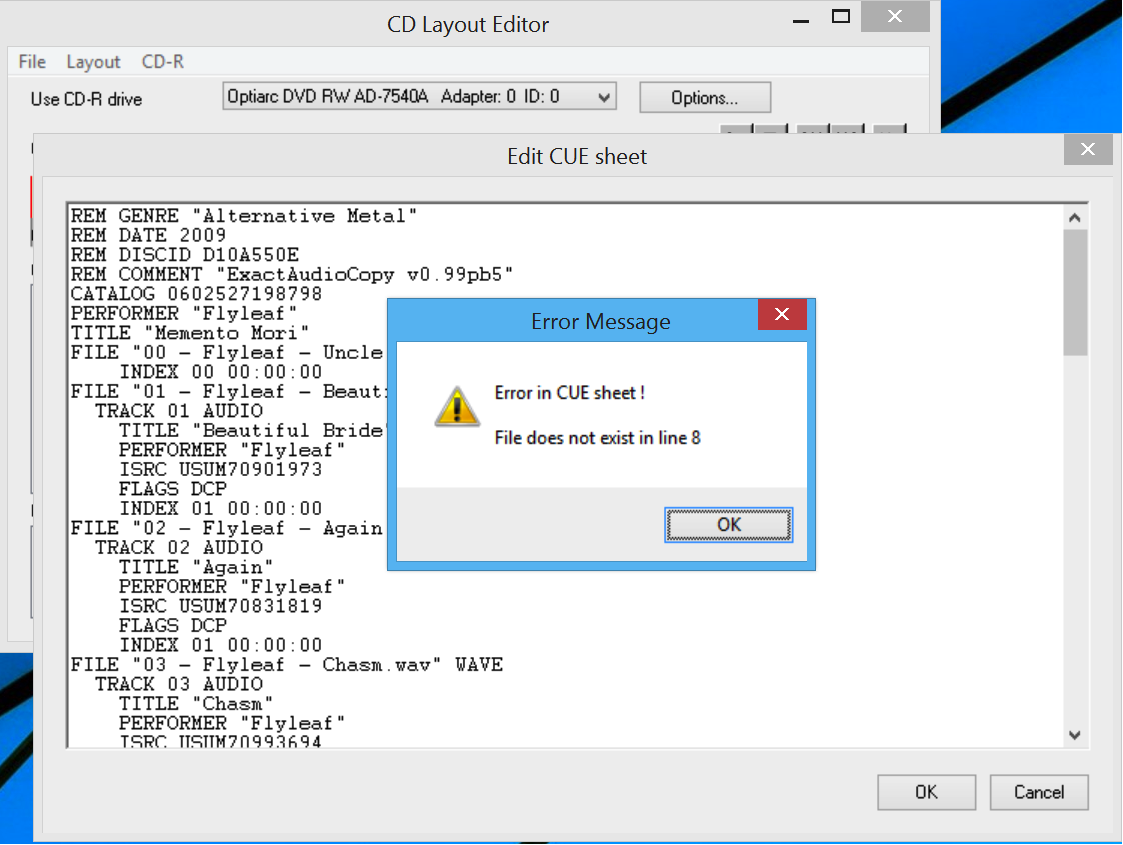
If you get an error while trying to load the CUE sheet, then it's probably because you've renamed files, and the files your CUE sheet is referencing do not exist. Or perhaps you haven't and the CUE sheet is wrong through no fault of your own. Nevertheless, rename the files referenced in the CUE sheet using a text editor, like Textpad in Windows, or to rename the files to as they appear in the CUE sheet. The former is easier.
FAIL
Success!
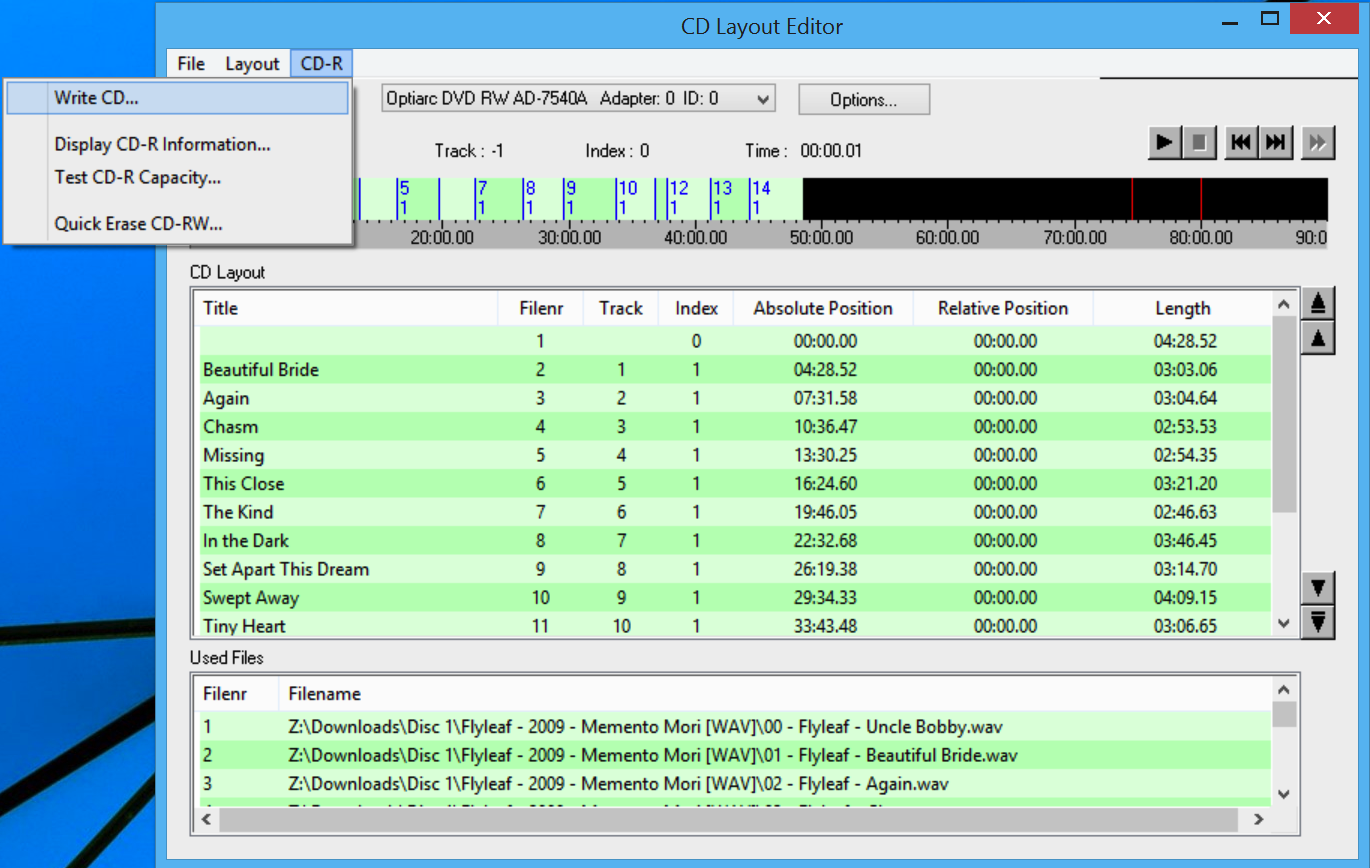
- CD-R > Write CD

- Select your options here....

... and press 'Make it So'
- Burning complete.


CD Rip Logs
Spotting Critical Mistakes in EAC Logs
What does it all mean?
Take, for example, the following log, checked with the Log Checker. First we'll show the log checker report, and then we'll discuss the problems identified.
Used drive : SAMSUNG CDRW/DVD SM-308B Adapter: 1 ID: 0

Read mode : Burst
Utilize accurate stream : Yes
Defeat audio cache : No
Make use of C2 pointers : Yes

Read offset correction : 0
Overread into Lead-In and Lead-Out : No
Fill up missing offset samples with silence : No
Delete leading and trailing silent blocks : Yes
Null samples used in CRC calculations : No
Used interface : Native Win32 interface for Win NT & 2000
Gap handling : Not detected, thus appended to previous track

Used output format : User Defined Encoder
Selected bit rate : 1024 kBit/s
Quality : High
Add ID3 tag : Yes
Command line compressor : C:\Program Files\foobar2000\components\flac.exe

Track1
Filename C:\My Torrents\Lykathea Aflame - Elvenefris\01 - Lykathea Aflame - Land Where Sympathy Is Air.wav

Pre-gap length0:00:02.00

Peak level 99.9 %
Track quality 100.0 %
Test CRC 0718DF52
Copy CRC 0718DF52
Copy OK

Track 5
Filename C:\Documents and Settings\Joe\My Documents\Downloads\z v0albums\Back to mine (mp3 v0)\Death in Vegas\05 - Death in Vegas - Songs-Ohia , Soul.wav

Suspicious position 0:02:46
Suspicious position 0:02:49

Missing samples
Peak level 0.0 %
Track quality 98.9 %

Copy finished

Track 7
Filename C:\Documents and Settings\Chriso\My Documents\Uploaded Torrent\Dreadzone - Sound\07 - Different Planets.wav

Peak level 97.9 %
Test CRC 2BB1DFB6
Copy CRC 103045EA

Copy OK


No tracks could be verified as accurate
You may have a different pressing from the one(s) in the database

There were errors

End of status report
Critical problems
The following points are the critical problems in this log:
- Read Mode: This should be secure, not burst. Extremely important!
- Read offset correction: You can check in an online database to see if this offset is correct for the drive that you have used.(Note that occasionally drives with the same name have different offsets.)
- Defeat audio cache: Most drives have a cache, so this should almost always be yes.
- Fill up missing offset samples with silence: Should be 'yes'.
- Delete leading and trailing silent blocks: Should be 'no'.
- Null samples used in CRC calculations: Should be 'yes'.
- Gap handling: Should be 'Appended to previous track'.
- Add ID3 tag: This should be 'no' for non-MP3 rips.
- Track 1: Should always have a line indicating pre-gap length. If that's not present, you did not detect gaps before ripping. The example above in green is how it should look.
- Track 5: Lines with Suspicious position are bad, just like the line Missing samples. And Copy finished is bad, too: it would say 'Copy OK' if the track was copied without errors.
- Track 7: The CRCs don't match - this is bad.
Minor problems
Things that aren't definitely issues and would require investigating in some cases, but are possibly not good:
- Make use of C2 pointers: Very few drives fully support C2, so this should usually be no.
- Overread into Lead-In and Lead-Out:This should be supported by the drive, particularly if it has an offset. If this is 'yes' and no errors occur, then that's better than it being no.
- Summary: No tracks could be verified as accurate:You may have a different pressing from the one(s) in the AccurateRip database, but if the summary states 'All tracks accurately ripped', then you can be almost certain that the rip went absolutely fine as far as getting the correct audio data goes. If it doesn't say 'All tracks accurately ripped', you can't be sure of anything. Maybe the rip went wrong, maybe you have a different pressing.
What is a non-audio deduction?
A non-audio deduction is a deduction for any setting which, while required for a 100% log score, does not affect the resulting audio data.
These are the non-audio log checker deductions
- Ripped with EAC 0.95 or earlier (-30 points)
- Ripped with EAC 0.99 during or after 2017 (-1 point)
- Log checksum not used with EAC 1.0 and newer (-15 points)
- XLD signature not appended with XLD 20121222 or newer
- Not using null samples in CRC calculations (-1 point)
- No "Scan ReplayGain" info (-1 point)
- Adding ID3 tags (-1 point)
- AccurateRip is not used (-5 points)
- XLDversion 2010/01/23 - 2010/07/04 log with AccurateRip enabled but cannot verify gaps detected, (-1 point)
Additionally, range rips which can be rescored according to 2.2.10.6. count as having a non-audio deduction.
What does this mean?
FLAC/Log rips with only non-audio deductions can trump those rips which have audio deductions. This means that, for example, a rip which scores 99% due to being ripped in EAC 0.99 can trump a rip with a CRC mismatch, and an EAC 1.0+ rip without the checksum can trump a rip made with the wrong offset correction.
Only a 100% rip can trump a rip with exclusively non-audio deductions.
CUETools Verification Guide
CueTools is a handy set of program tools for verifying, ripping, and splitting lossless audio files. This guide gives a quick overview of the "Verify" function which checks CD rips against both the AccurateRip (AR) and CueTools (CTDB) databases. This feature is very handy for checking if Exact Audio Copy (EAC) and X Lossless Decoder (XLD) rips have been ripped correctly. It also outputs the track CRCs (with and without null samples), peak levels of the audio files, and compares EAC log track information.
Database Comparisons
AccurateRip - ARv1 and ARv2
- Older database in use since 2003 with more than 2 million discs
- Two flavours available: v1 and v2
- v1 has more submissions, but flawed implementation (ARv1 has a flawed algorithm that skips 3% of audio data in calculating track checksum.)
- v2 addresses the shortcomings of v1 with an improved algorithm
- Drive offsets are part of the CRC calculation for AR submissions (i.e. a badly configured offset or shifted samples may result in inaccurate results.)
- Contains an authoritative collection of drive offset values
- Rips containing the same data but different offsets are called "Pressings"
- At least 10 common CD ripping programs support AR integration and checking
CUETools DB - CTDB
- Newer database that started in 2011 with fewer discs than AccurateRip
- Offset is not calculated in checksums, so drive offsets do not affect database match results.
- CTDB stores checksums for both disc TOCs and individual tracks.
- Can indicate the closest match to your track and also indicate which samples are different.
- Includes features to "repair" tracks with errors. A CTDB confidence rating of 2 or more is a recommended safe choice for patching files.
- CTDB Ignores disc pre-gaps, so no recovery for HTOA or hidden tracks.
- Has special CRC comparative functions with EAC logs only.
- Available in less CD ripping programs (as of 2017, EAC and CUETools only)
Installation
- Install CueTools on your system. Simply unzip the .zip archive into your desired folder. For most purposes, the current stable release is the best version to pick.
- CueTools will run on both Windows (.NET) and non-Windows using Mono. The Mono version can only read WAV files, so ensure your FLAC files are uncompressed if verifying your rip with this library. (The lossless plugins have not been ported to C#.) . UPDATE: Linux/Mac users do NOT need to convert to wav to use CUETools. The mono version can read and write FLAC (and ALAC) files since it has an encoder/decoder written in C#. However it is not enabled by default. To use go to Settings -> Formats -> flac and for both encoder and decoder select 'cuetools'.
- CUETools can be easily started by double-clicking on the CUETools.exe. If running the program from Mono, you can only launch the .exe file within the CueTools program folder. In Windows, you can create shortcuts to the program.
Verification Steps
- Select the "Settings" button in the top right corner.

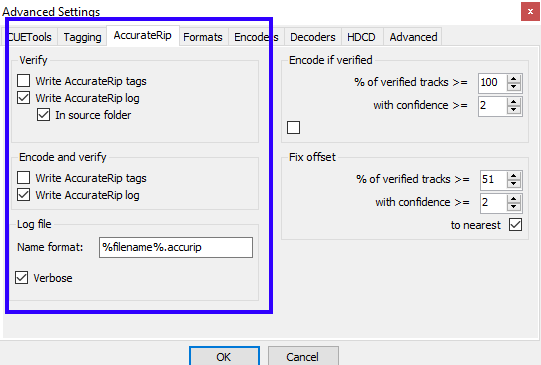
- Select the "AccurateRip" Tab. Check "Write Accurate Log." If you want it placed in the source files folder, check that option too. If you want the file to have a different name format, enter it in the "Log File" box. By default, the AccurateRip file will have the cuesheet-filename.accurip filename. Make sure to enable "Verbose" to get as much information as possible.

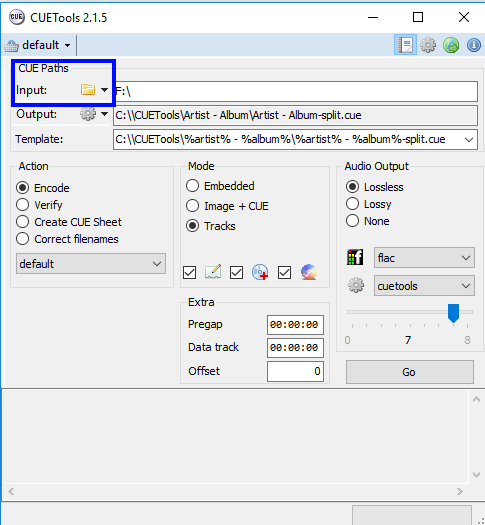
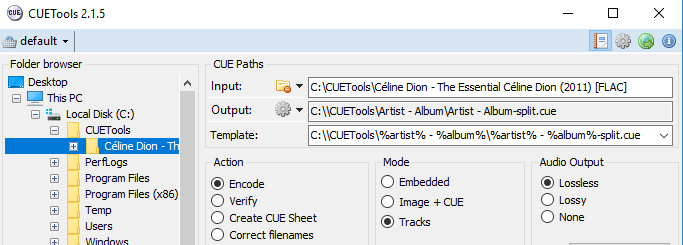
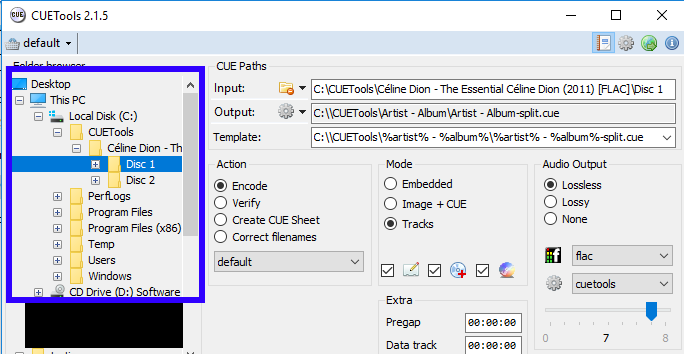
- Click the folder icon next to Input Under the "CUE Paths" Section. This will open a file browser that will let you select the directory that contains the CUE sheet or the CUE sheet itself.


- Click to select the directory or CUE sheet. It should show up in the Input box.

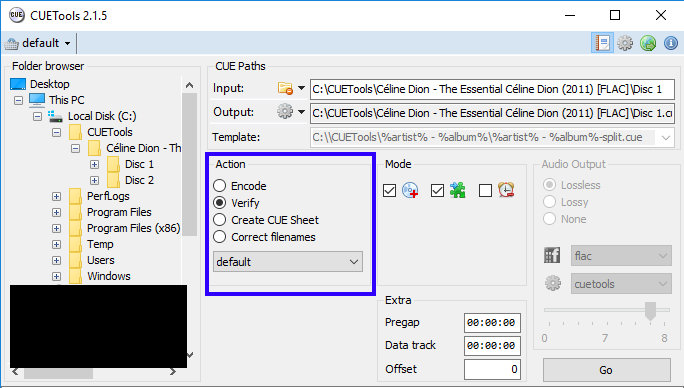
- Select "Verify" from the radio buttons for Action. Leave the default option on. Click the "Go" button to begin verifying your audio tracks.

- As the verification process happens, it will get outputted to the bottom of the window. If you specified for it to write an AccurateRip log, the same information will be saved to a text file (as shown earlier).

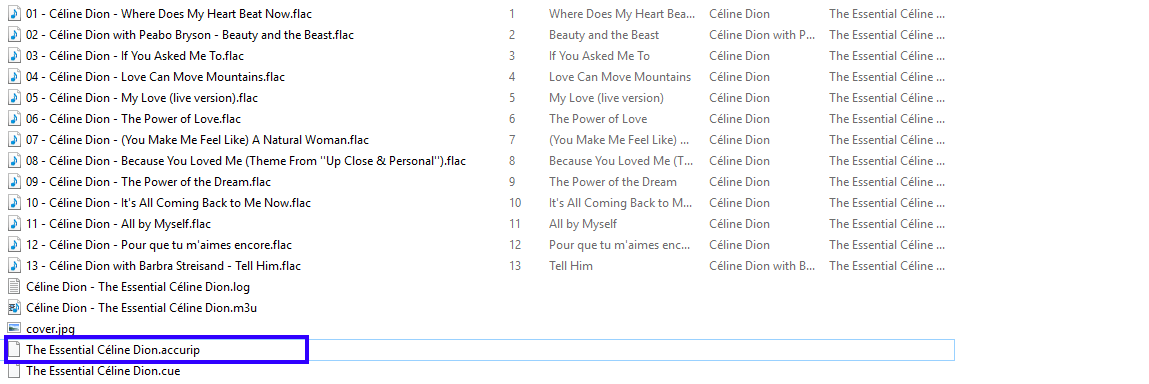
- After it has completed, if you followed the exact steps earlier in this guide, you will find the results saved to cuesheet-filename.accurip.

- You can open this .accurip file in any text editor of choice to examine the contents.


Reading The Verification Log
This is a quick overview of the verification log.
CUETools Header
This part is the CUETools header which contains the report date and CUETools version used.
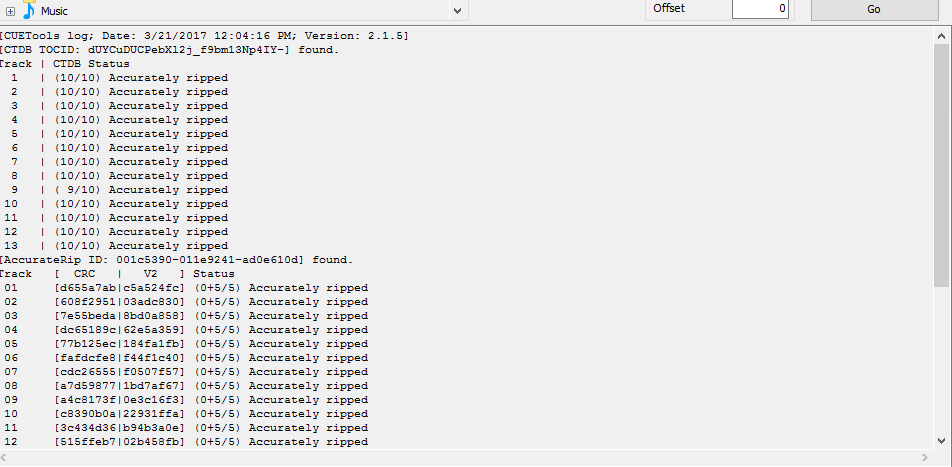
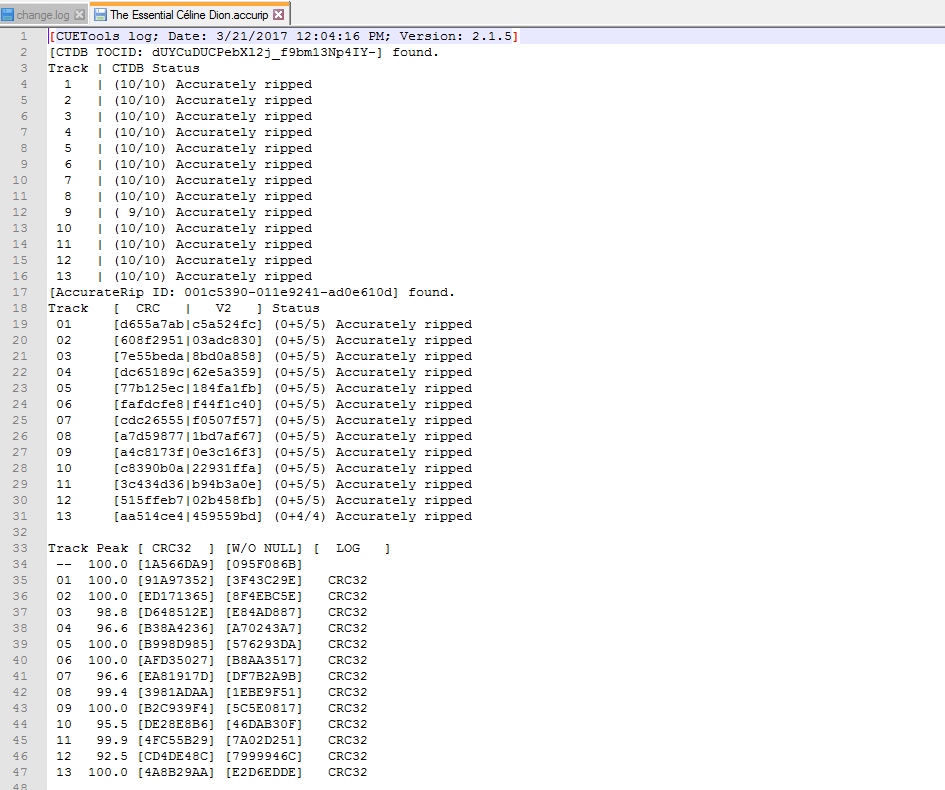
CUETools log; Date: 3/21/2017 12:04:16 PM; Version: 2.1.5]CTDB Section
This section indicated that there was a match against the CUETools Database. Tthe disc's CTDB signature is displayed (based on the entire disc). The (X/Y) format indicates how many matches out of the total rips of the same disc in the database. In this case, it matches all 10 out of 10. This example does not have differing samples to any matches, but you will see it indicated next to the track. Track 9 is a notable exception since it only matches 9 out of 10 records, possibly due to a slightly different rip result. However, it still has a high confidence in regards to matched tracks.
[CTDB TOCID: dUYCuDUCPebXl2j_f9bm13Np4IY-] found.
Track | CTDB Status
1 | (10/10) Accurately ripped
2 | (10/10) Accurately ripped
3 | (10/10) Accurately ripped
4 | (10/10) Accurately ripped
5 | (10/10) Accurately ripped
6 | (10/10) Accurately ripped
7 | (10/10) Accurately ripped
8 | (10/10) Accurately ripped
9 | ( 9/10) Accurately ripped
10 | (10/10) Accurately ripped
11 | (10/10) Accurately ripped
12 | (10/10) Accurately ripped
13 | (10/10) Accurately ripped
AccurateRip Section
This table has a bit more information since it outputting matches against both ARv1 and ARv2 databases. Each track will have a unique AR CRC value. The V2 value means (ARv1 matches + ARv2 matches / Total # of matches). In this example, there are no matches for the ARv1 database, but there are 5 in the ARv2 database. Most tracks match 5 of those matches. The exception is Track 13, where it matches only 4 out of 4 total records.
[AccurateRip ID: 001c5390-011e9241-ad0e610d] found.
Track [ CRC | V2 ] Status
01 [d655a7ab|c5a524fc] (0+5/5) Accurately ripped
02 [608f2951|03adc830] (0+5/5) Accurately ripped
03 [7e55beda|8bd0a858] (0+5/5) Accurately ripped
04 [dc65189c|62e5a359] (0+5/5) Accurately ripped
05 [77b125ec|184fa1fb] (0+5/5) Accurately ripped
06 [fafdcfe8|f44f1c40] (0+5/5) Accurately ripped
07 [cdc26555|f0507f57] (0+5/5) Accurately ripped
08 [a7d59877|1bd7af67] (0+5/5) Accurately ripped
09 [a4c8173f|0e3c16f3] (0+5/5) Accurately ripped
10 [c8390b0a|22931ffa] (0+5/5) Accurately ripped
11 [3c434d36|b94b3a0e] (0+5/5) Accurately ripped
12 [515ffeb7|02b458fb] (0+5/5) Accurately ripped
13 [aa514ce4|459559bd] (0+4/4) Accurately ripped
EAC Peaks / Track CRC Section
Should be pretty straightforward here. The LOG column is created when CUETools detects an EAC log in the same folder. The values under it will indicate what kind of CRC is in the rip log, and also if there were differences between the CUETools Verification Log CRCs to the EAC ones.
Track Peak [ CRC32 ] [W/O NULL] [ LOG ]
-- 100.0 [1A566DA9] [095F086B]
01 100.0 [91A97352] [3F43C29E] CRC32
02 100.0 [ED171365] [8F4EBC5E] CRC32
03 98.8 [D648512E] [E84AD887] CRC32
04 96.6 [B38A4236] [A70243A7] CRC32
05 100.0 [B998D985] [576293DA] CRC32
06 100.0 [AFD35027] [B8AA3517] CRC32
07 96.6 [EA81917D] [DF7B2A9B] CRC32
08 99.4 [3981ADAA] [1EBE9F51] CRC32
09 100.0 [B2C939F4] [5C5E0817] CRC32
10 95.5 [DE28E8B6] [46DAB30F] CRC32
11 99.9 [4FC55B29] [7A02D251] CRC32
12 92.5 [CD4DE48C] [7999946C] CRC32
13 100.0 [4A8B29AA] [E2D6EDDE] CRC32