
How to Install and Setup EAC to Make Flawless Rips on Linux
REDACTED.ch Wiki article imported on 15-02-2023
Running EAC in Wine is currently the only way to get 100% logs on Linux. Ripping with a virtual drive, from a virtual machine (such as VirtualBox or VMWare) will not produce verifiable logs. Any torrents ripped from inside a virtual machine will have their logs removed from the site, and the torrent will be equivalent to logless. (An exception applies if using a USB disc drive through a virtual machine, as these have their names correctly displayed on logs. Please double check such logs before uploading though, and also make sure that EAC is set up accordingly to the wiki articles linked at the bottom of the page to avoid deductions for incorrect rip settings.)
These directions should work under any flavor of Linux that runs Wine. This guide was written with Debian testing in mind, but the only things which should differ between distributions are the package manager commands - please adapt them to the distro you're running.
Install Wine
The first step is to install Wine.
It is highly recommended to use Wine 4.6 or newer, since it is the first version which enables plugin support in EAC. This will allow you to produce logs which include the CUETools report for your rip.
Via your distribution's package manager
You should use your distribution's packages if it provides them. However, the Wine project provides builds for a few distributions, so you may choose to use their builds if the package in your distribution is older or unusable for any other reasons. At the time of writing, Debian provides version 4.0 in their repositories - which is a little too old for this particular use case due to the reason mentioned above. Luckily, installing the package from the Wine repositories can be done with just a few commands:
wget https://download.opensuse.org/repositories/Emulators:/Wine:/Debian/Debian_Testing_standard/amd64/libfaudio0_19.04-0~buster_amd64.deb wget https://download.opensuse.org/repositories/Emulators:/Wine:/Debian/Debian_Testing_standard/i386/libfaudio0_19.04-0~buster_i386.deb sudo dpkg --add-architecture i386 sudo dpkg -i libfaudio0_19.04-0~buster_amd64.deb sudo dpkg -i libfaudio0_19.04-0~buster_i386.deb wget -O - https://dl.winehq.org/wine-builds/winehq.key | sudo apt-key add echo 'deb https://dl.winehq.org/wine-builds/debian/ testing main' | sudo tee -a /etc/apt/sources.list >/dev/null sudo apt update sudo apt install --install-recommends winehq-devel winetricksVisit the Wine project's page concerning their Debian builds if something doesn't work properly.
Making a custom Wine build
If, for some reason, you cannot use the newer versions, consider making a custom Wine build of an older version with a patch enabling EAC's plugin support. This is a slightly adapted version of what's available on the Wine wiki about making builds on Debian. Keep in mind that due to differences in how distributions handle the issue of multiple architecture libraries, this part of the guide is meant exclusively for Debian.
First of all, download the needed chroot machinery from the repositories and edit the configuration file :
sudo apt-get install schroot debootstrap sudo nano /etc/schroot/chroot.d/debian_i386.confHere are the contents of mine :
[debian_i386]
description=Debian Unstable 32-Bit
personality=linux32
directory=/srv/chroot/debian_i386
root-users=foobar
type=directory
users=foobar
Prepare the chroot so you can download the packages and enter it :
sudo mkdir -p /srv/chroot/debian_i386 sudo debootstrap --variant=buildd --arch=i386 testing /srv/chroot/debian_i386 http://ftp.debian.org/debian sudo cp /etc/apt/sources.list /srv/chroot/debian_i386/etc/apt/ schroot -c debian_i386 -u rootYou are now logged in as root inside the 32-bit chroot.
apt-get update apt-get install build-essential wget apt-get build-dep libwineexitThose commands will make sure you have the stuff that you need to compile wine in the 32-bit chroot, as well as build dependencies of the libwine package provided in the repositories so Wine compiles with all the optional features that you might or might not need. You can now re-enter the chroot as a regular user to perform the build :
schroot -c debian_i386 cd /home/foobar # this will enter /home/foobar in your host system wget https://dl.winehq.org/wine/source/4.0/wine-4.0.tar.xz tar xf wine-4.0.tar.xz wget -O wine-sxs-support.patch https://source.winehq.org/patches/data/150654 cd wine-4.0 patch -p1 -i ../wine-sxs-support.patch mkdir -p /home/foobar/wine-install ./configure --prefix=/home/foobar/wine-install make # optionally add -jN where N is the number of cores make installexitAnd voila! You're back to your regular system and the 32-bit Wine installation is now available in /home/foobar/wine-install. You still need to install the 32-bit support packages on your host system in order to actually run it, though :
sudo dpkg --add-architecture i386 # in case you haven't done this before sudo apt-get install libwine:i386This will install the libwine package and all its dependencies, which means that you end up with the same set of packages that Wine was compiled against in your 32-bit chroot. Remember to add the location into your PATH so the Wine binaries can be easily called from the shell and found by other tools :
export PATH="/home/foobar/wine-install/bin:$PATH"Let Wine see your optical drives
Wine needs the optical drives to be referenced in /etc/fstab in other to see them. The drives themselves don't need to be mounted, but the mount points do need to exist. Your optical drive's device node is most probably /dev/sr0 if you only have one drive - if you have multiple, list the entries inside /dev/disk/by-id to find out which drive maps to which device node :
$ ll /dev/disk/by-id/* lrwxrwxrwx 1 root root 9 Apr 6 23:08 /dev/disk/by-id/ata-LITE-ON_LTR-52327S -> ../../sr1 lrwxrwxrwx 1 root root 9 Mar 27 21:29 /dev/disk/by-id/ata-TSSTcorpCD_DVDW_SH-W162C -> ../../sr0Now, create an entry inside /etc/fstab for each drive that you want to use, changing the device path (first token) and the mount point (second token) appropriately :
echo '/dev/sr0 /mnt/drive0 auto ro,user,noauto,unhide 0 0' | sudo tee -a /etc/fstab >/dev/nullDon't forget to actually create the mount points that /etc/fstab now references :
sudo mkdir -p /mnt/drive0You will also need to give optical drive read/write permissions to the user you're running Wine as. Linux distributions usually give these permissions to particular groups - in order to see which group you need to be a member of, check the owner of the device node representing the device that you want to use :
$ ll /dev/sr* brw-rw---- 1 root cdrom 11, 0 Mar 27 21:29 /dev/sr0 brw-rw---- 1 root cdrom 11, 1 Apr 6 23:08 /dev/sr1As you can see, Debian gives R/W permissions to these device nodes to members of the "cdrom" group. It's thus enough to add your user ("foobar" in this example) to this group :
sudo gpasswd -a foobar cdromMake an exclusive EAC prefix
Wine operates in what it calls "Wine prefixes". Each prefix is essentially a separate Windows installation as far as Windows programs are concerned. It is usually recommended to have a separate prefix for every application installed, since this allows to isolate all the application-dependent workarounds which might be necessary, and make sure that they won't be influenced by any other applications installed into this particular prefix.
Making a Wine prefix boils down to creating a separate directory and setting two environment variables :
mkdir /home/foobar/.eac-prefix export WINEPREFIX=/home/foobar/.eac-prefix export WINEARCH=win32Remember to set the WINEPREFIX variable every time you want to run applications from that prefix, or modify it in any way. If you fail to do that, Wine will run with the default prefix of $HOME/.wine, which might contain other applications and settings which could possibly conflict with EAC. The WINEARCH variable is only needed for the first run inside a given prefix in order to set it up as 32-bit only due to .NET 2.0 bugs occurring in 64-bit prefixes.
Configure the EAC prefix
You should now be able to run
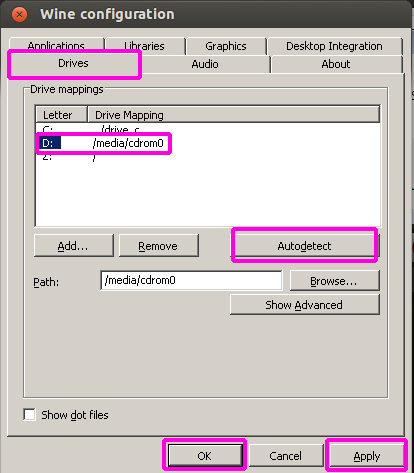
winecfgand see the Wine configuration window. First of all, change the Windows version to 7 in the bottom part of the window. Then, click on the "Drives" tab, and click "Autodetect". The table should fill with all drives Wine could find referenced in /etc/fstab : if you've done everything properly, you should also see your optical drives' mount points with Windows drive letters assigned to them.
If you want to, you can remove the drive letters referring to mount points which aren't your optical drives (except drive C referring to the virtual "drive C" inside the EAC prefix), but it's not necessary.
Here's how the window should look like if everything's OK (do note that the mount point in the screenshot is /media/cdrom0, expect to see the one you've used instead) :
Install .NET 2.0, .NET 4.0 and Visual C++ 2008
EAC does not work with the alternative .NET implementation called Mono, so we're going to use the helper script called winetricks, which allows installing additional components produced by Microsoft that provide functionality not yet implemented in Wine. In this particular case, this is necessary in order to install the Microsoft .NET 2.0 Framework package.
Winetricks might be provided by your distribution's packages, but it can just as easily be downloaded straight from Github :
wget https://raw.githubusercontent.com/Winetricks/winetricks/master/src/winetricks chmod +x winetricksThen, tell the script to download the .NET 2.0 runtime, .NET 4.0 runtime and Visual C++ 2008 Redist. :
./winetricks dotnet20 ./winetricks dotnet40 ./winetricks vcrun2008Click through the installer's dialogs until it finishes.
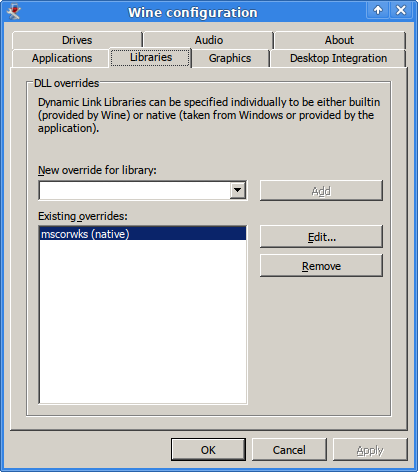
Activate the DLL override
Newer Wine versions have a modified implementation of one of the DLLs called mscorwks. Unfortunately, it causes issues when running some of the plugins available in EAC. It is thus necessary to disable the Wine implementation and always use the one installed by the dotnet20 package. This can be done in running
winecfgagain and going to the "Libraries" tab, typing "mscorwks" to the text field, and clicking "Add". The tab should look like this after all that :
Download and install EAC
The latest EAC version at the time of writing is 1.3, and can be downloaded from the official website. After downloading the installer, run it directly with :
wine eac-1.3.exeClick through the installer's dialogs until it finishes. Uncheck "Run Exact Audio Copy" in the last dialog, though, since there is still one thing before actually running EAC.
Running EAC
EAC is run from inside the Microsoft.VC80.CRT directory inside its installation directory via the Windows shortcut, which is most probably done in order for it to load the appropriate runtime DLL. This behaviour should be preserved when running EAC via Wine - I use the following Bash function to do just that :
function eac {
  local wineprefix="$HOME/.eac-prefix"
  local eacdir="${wineprefix}/drive_c/Program Files/Exact Audio Copy"
  pushd "${eacdir}/Microsoft.VC80.CRT"
  WINEPREFIX=$wineprefix WINEDEBUG=-all wine "${eacdir}/EAC.exe"
  popd
}
This assumes that you've installed EAC to its default directory and the EAC prefix is the same one as the one used throughout this guide. If you add this function to your .bashrc file, you'll be able to simply start EAC by running the command "eac" in your shell, which I recommend doing.
No Comments